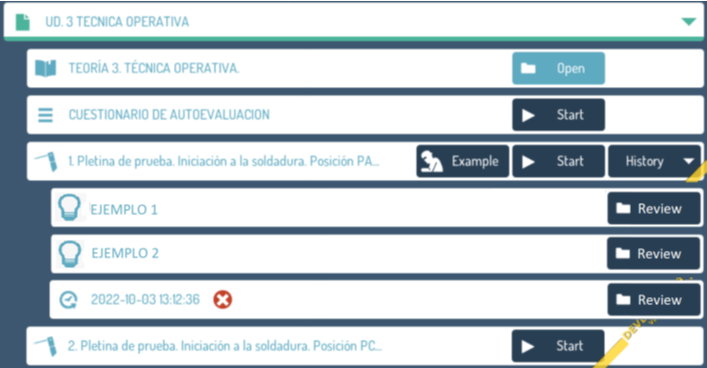
SOLDAMATIC E-LEARNING
Soldamatic e-Learning is an LMS (Learning Management System) based on Moodle and designed to manage and administer the teaching and learning process of welding from the simulator. This platform provides access to the Soldamatic Database and therefore acts on it. Like any LMS it has two types of access, one for the teacher and one for the student.
The application for the teacher will have the following functionalities:
- Content Creation: It allows to create welding exercises with open parameters to design a customized WPS. From this application it is possible to customize parameters that are inaccessible in Open Practices. In addition, it is possible to add theoretical teaching materials, such as documents, presentations, HTML, etc. Creating customized courses to assign them to students.
- Progress Monitoring: Provides tools to track students’ progress, such as visualization of theories, exams and welding practices with a detailed analysis of the welding result, comparative graphs with the rest of the classmates, etc.
- Communication: Facilitates communication between teachers and students through messages in a simple chat, allowing discussion forums, consultations, announcements, etc.
- Evaluation: Allows the creation of multiple-choice tests, with the possibility of automatically evaluating the answers and providing instant feedback.
The student, from the access to the LMS, has:
- Resource Access: Provides easy access to learning materials associated with welding anytime, anywhere, allowing students to study at their own pace.
- Immediate Feedback: Students can receive immediate feedback on their performance on assessments, allowing them to identify areas for improvement. They can also track their own progress, identify areas of strength and weakness, and take steps to improve their skills.
- Communication: Facilitates communication with teachers and chat partners.
The teacher and student interface and its functionalities are detailed below.
Teacher’s access
Desktop App Installation
Soldamatic e-Learning is included in the Soldamatic Key (USB) that you receive with your order.
Before installing the application, please check the following requirements:
Minimum requirements for Windows:
- Windows 10 64 BITS
- Processor: Intel I5 2.5GHz
- RAM: 8GB
- Graphic card: NVIDIA GEFORCE 950
Minimum requirements for MacOS:
- OS Min: High Sierra 10.13
- Processor: Intel I5 1.86GHz
- RAM: 8GB
- Graphic card: Intel Iris Plus Graphics 640
Connect your Soldamatic key to your computer. You will see 2 .rar files. For Windows and for Mac. Select the desired operating system.
Unzip the selected .rar file and click on the Soldamatic e-Learning symbol to start the installation.
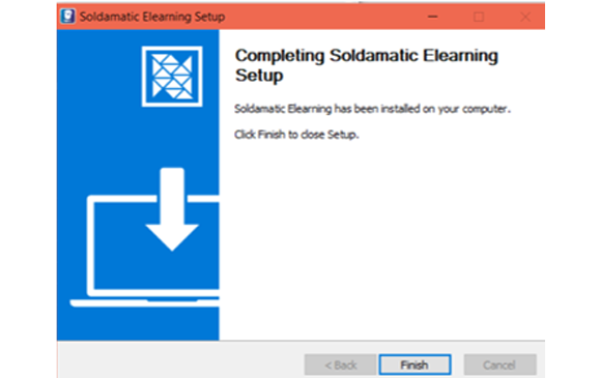
Click «Finish» to complete the installation process.
IMPORTANT: In case you update your SOLDAMATIC, you must to download the related version for e-Learning app. Follow the next steps to do so.
e-Learning update
First, please uninstall the previous version of the Soldamatic e-Learning app. On your Windows computer, go to the Start menu, or on your MacOS device, locate the app in the Application folder. Once you have found it, right-click on it and select «Uninstall».
Next, restart your computer. After restarting, you can proceed to download the new version of the e-Learning app (go to the Partners Area to download it). Extract the file and install it by double-clicking the .exe file and following the installation process.
Desktop login
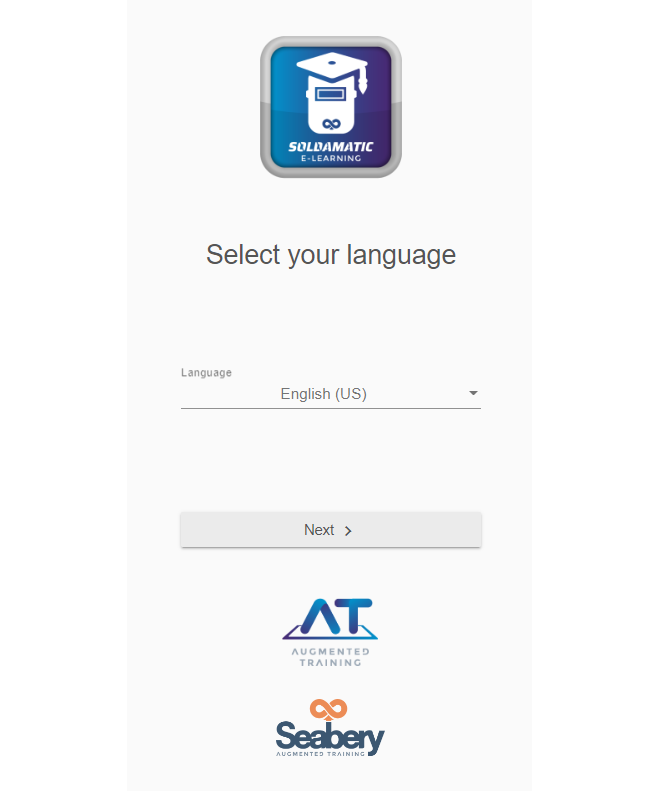
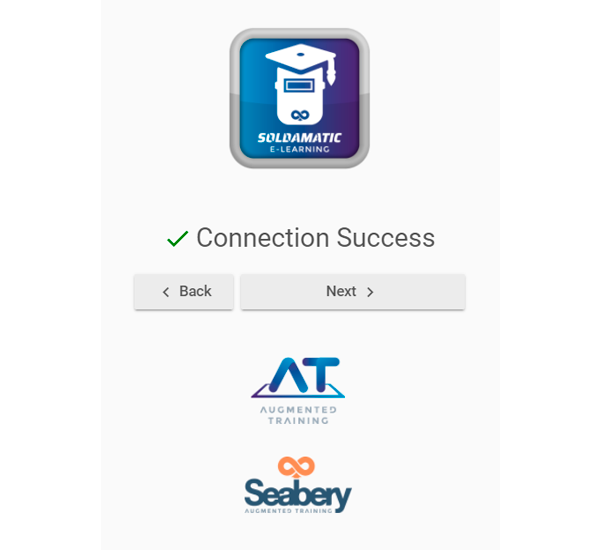
Select your language and click next. The following access options will appear depending on the type of Soldamatic connection:
1. Simulator Access Point: when you access this Login option in the desktop application, you will have to choose the network in which you want to connect if you have more than one simulator. If you only have one, it will connect automatically.
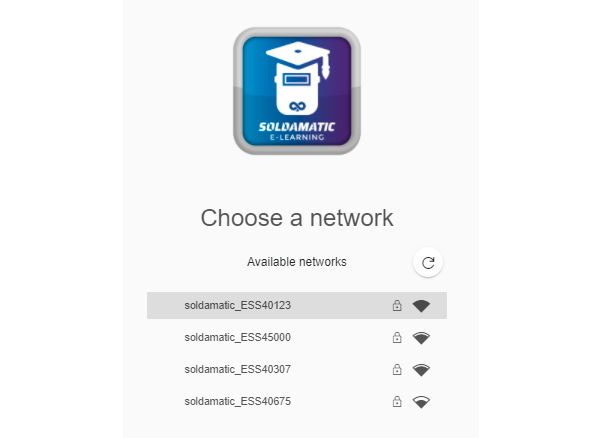
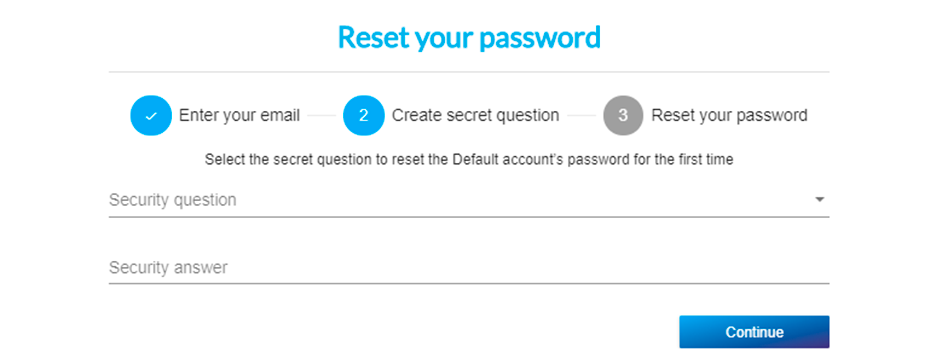
NOTE: After the first login a password change will be requested.
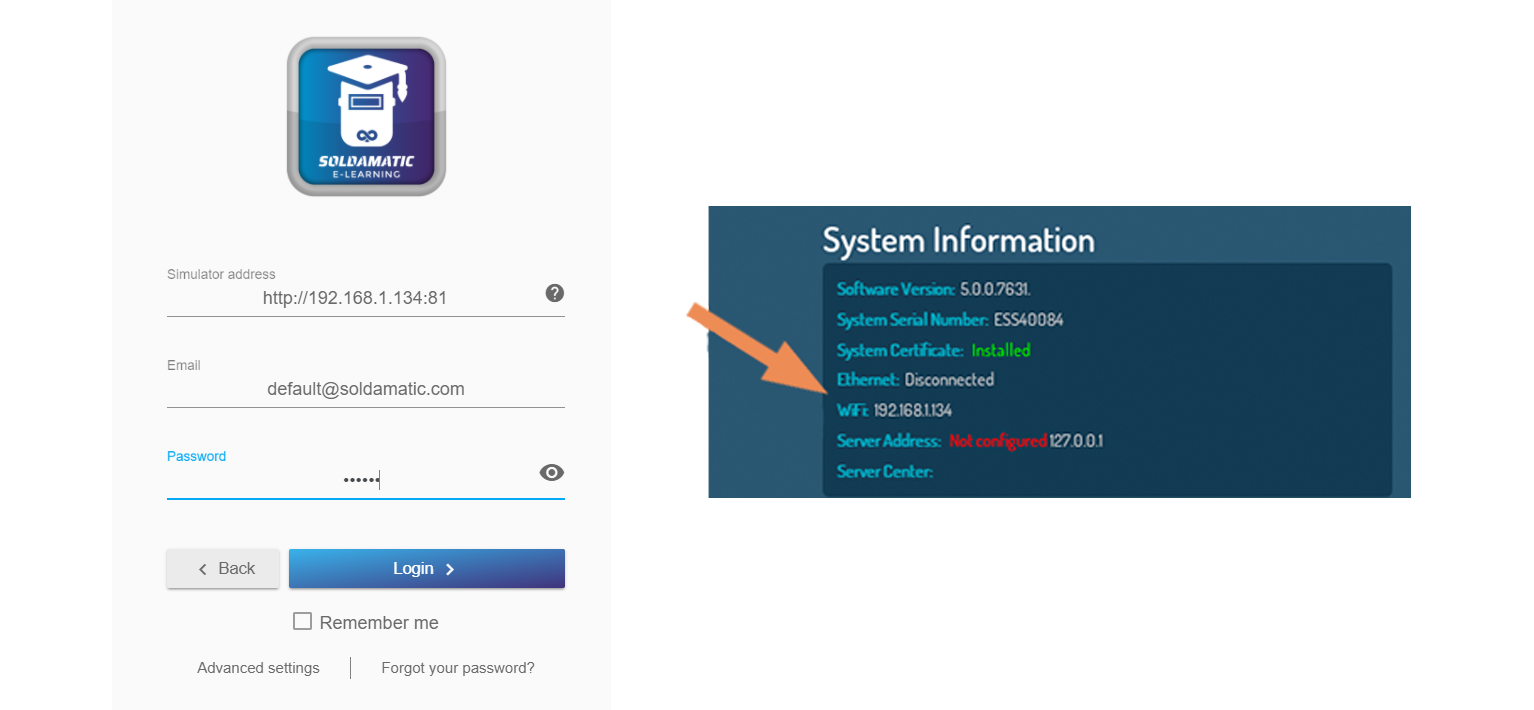
2. Own network: enter the Simulator address that appears in the system settings of the simulator. The simulator must be connected to the same network as the PC/laptop, either via wifi or ethernet.
5. On premise:
a. Soldamatic network: A list of available Soldamatic networks will be displayed. Select the network you wish to connect to.
Enter the network security key ‘soldamatic’.

Next, enter your access data and login.
b. Own network: enter the server address and login.
To do so, connect the server to an external screen. You will see the following window.
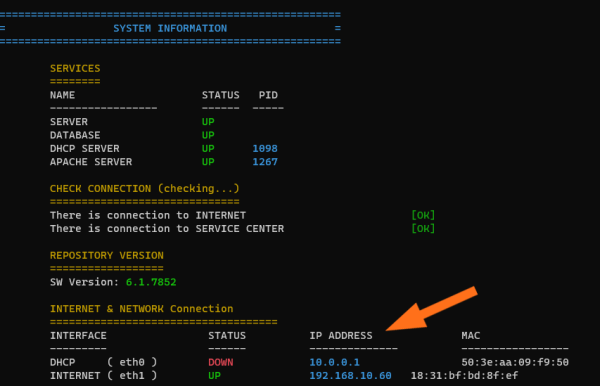
Web access
The address to access the Soldamatic e-Learning website will depend on the type of connection you are going to make. Type in your browser one of the following URLs:
- On cloud https://elearning.soldamatic.com
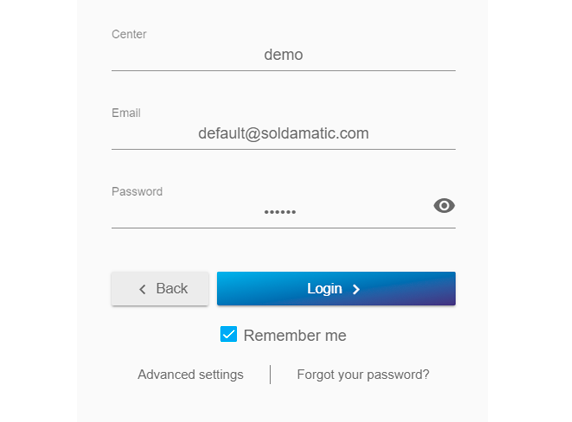
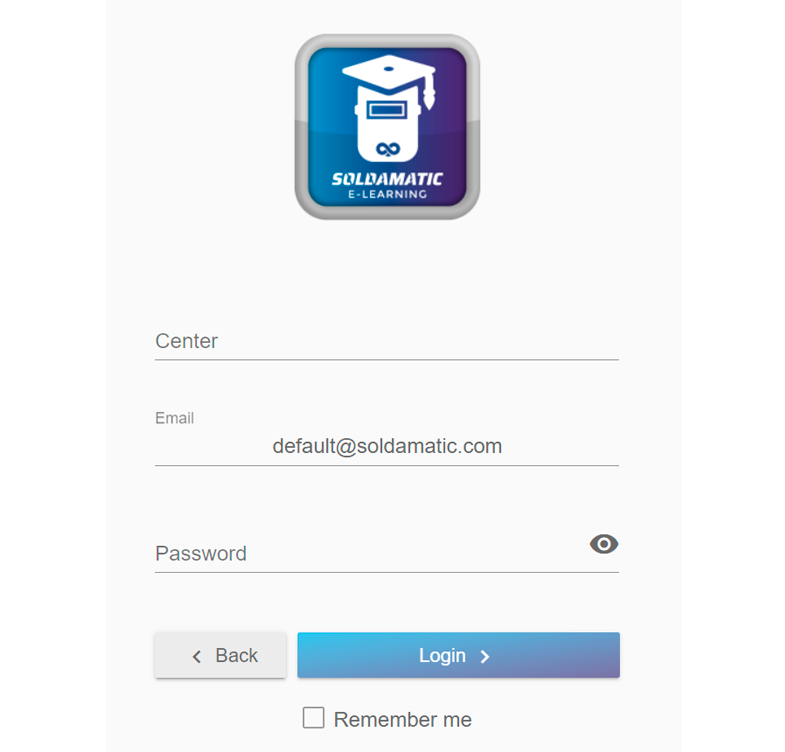
Enter your access data (name of the centre provided by Seabery, email, password) and click on login to access.
- On cloud https://elearning.soldamatic.com
- On premise http://IpServer
- To simulator http://IpSimulator
If you need to check the address of your simulator or server, you can do so either at the bottom of the Home window, or in the configuration menu, in the system information window.
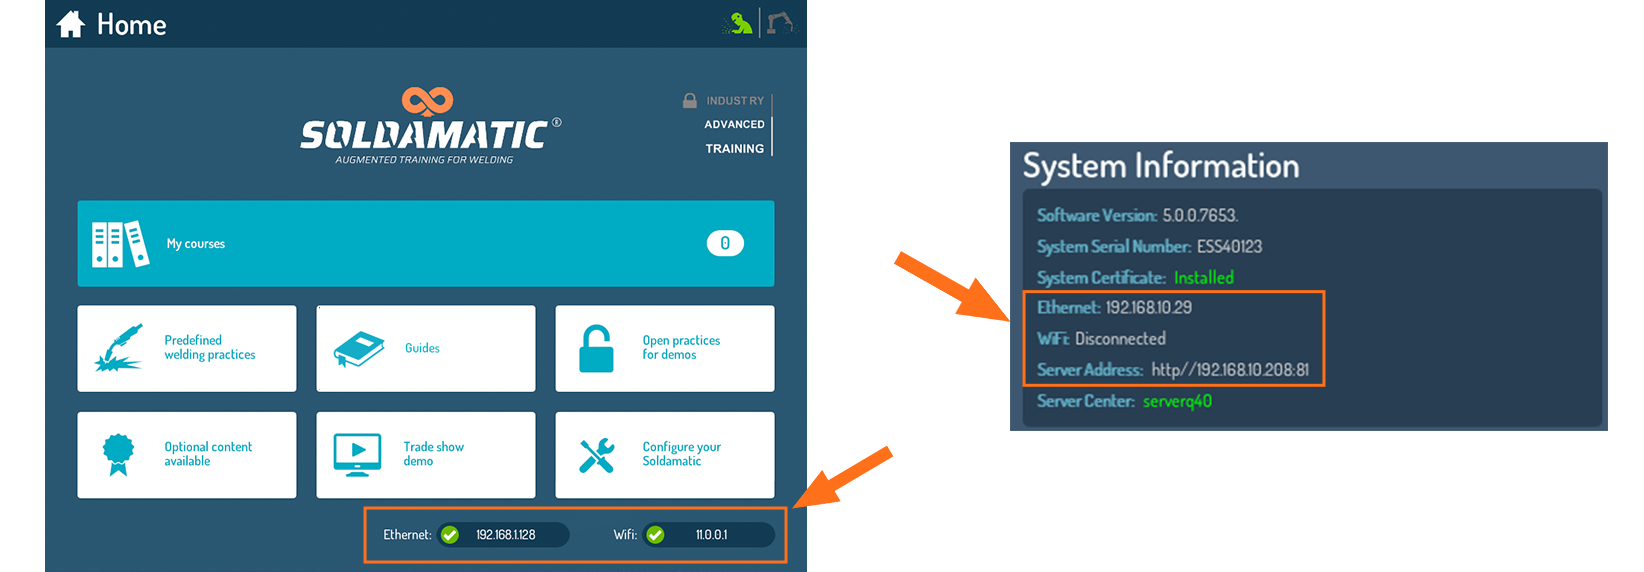
REMEMBER: Now the IP address of the simulator (Access Point) is: 11.0.0.1
In both cases, the first step is to connect your laptop/PC to the Soldamatic network available in the list of wireless networks. Find the wireless network that has the serial number of your simulator.

Click «Connect». You will be prompted to enter a PIN from the router label. Ignore this option and click «Connect using a security key».

Enter the network security key ‘soldamatic’.
When accessing via «On premise» or via «Simulator» you will see the image below. Select «Teacher Access».

In the next screen enter the access credentials:
email: default@soldamatic.com
password: 123456

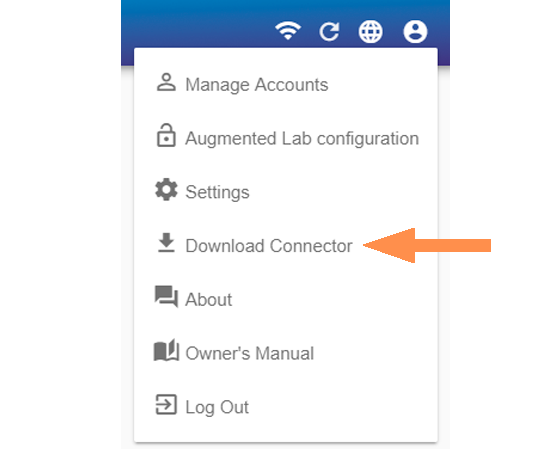
You will need to download a connector to set up an Augmented Lab or to view some exported files from the system. The download link is located in the Account and settings section.

IMPORTANT: In case you update your SOLDAMATIC, you must to download the related version for e-Learning app and them unistall the Connector and download it again from the new e-Learning version. Follow the next steps to do so.
Connector update for e-Learning teacher: if you use the web version of the e-Learning app, it is likely that you have the AM connector installed. Therefore, please ensure that you uninstall the current AM connector and use the new version of the e-Learning.
Connector update for e-learning student: please ensure that you uninstall the AM connector to use the new version.
Execution of the Analysis Module
To ensure the proper functioning of the Analysis Module, please note the information in the following table:

In case you detect any performance issues when running the Analysis Module, see «How to configure the Soldamatic AM app to use profile high performance«.
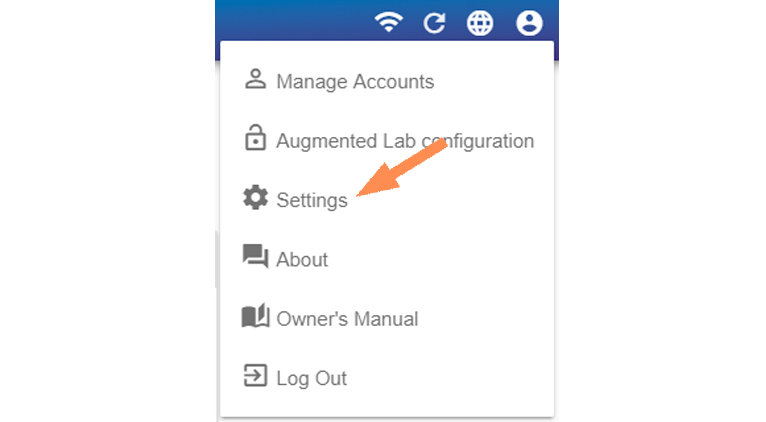
Teacher’s access: Settings
Change language
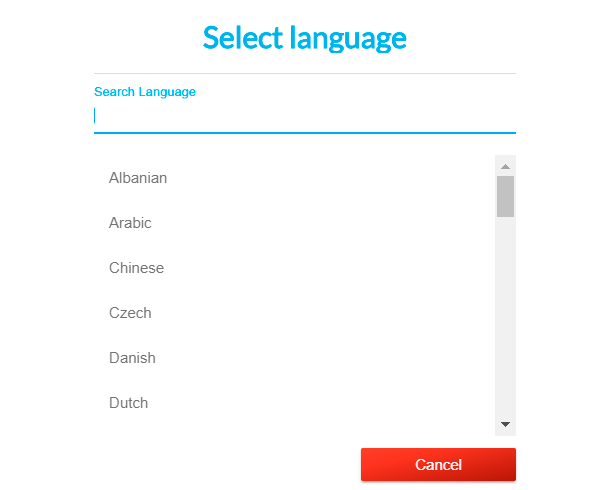
Select the language of your preference here:
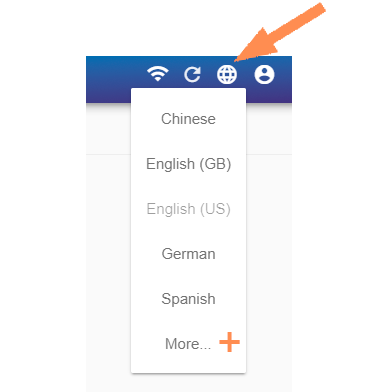
You will find more than 30 languages available. Select «More» (+) to see them all.
Manage accounts
Here you can manage the Soldamatic instructor accounts.

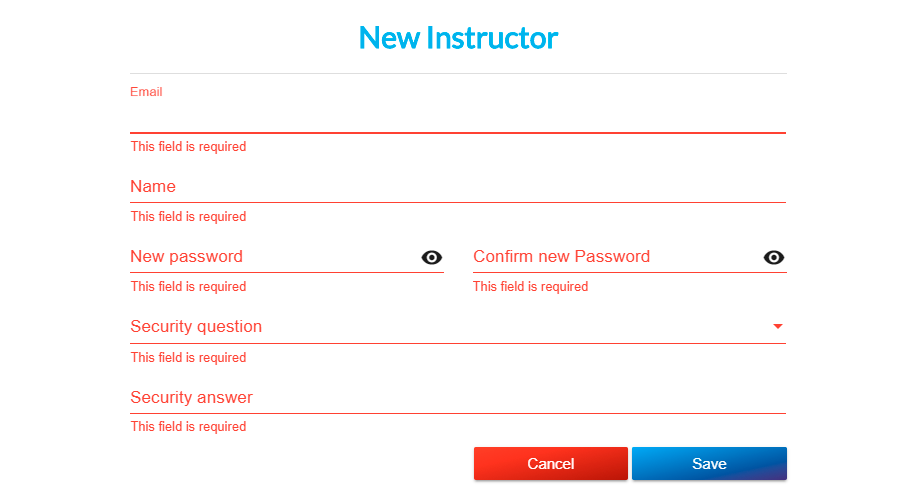
NOTE: All instructors will have access to all information stored in Soldamatic, regardless of the instructor who created it.
3. Select an instructor from the list and use this option to see his/her name.
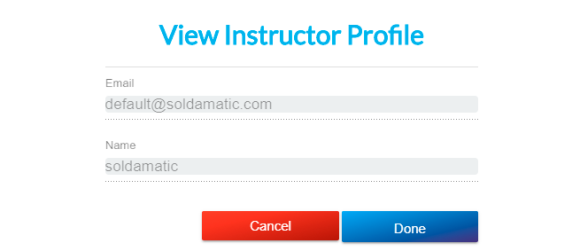
4. You can edit only the name of the instructor.

5. Reset the account password. Enter the email address and answer the security questions before resetting the password.
6. Delete an instructor. Enrolments, progress and related data will also be deleted.
IMPORTANT: You can only edit or delete the instructor you have registered with.
Augmented Lab Configuration
Here you can give access to the server to the simulators of a classroom.
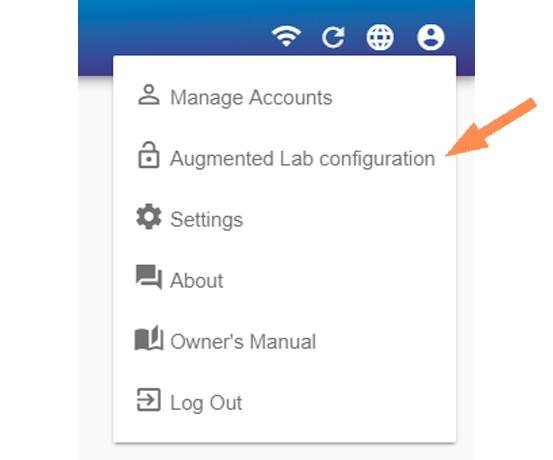
In the following screen you can choose one of the simulators listed or add one or more.

You must enter the IP Address of the Soldamatic simulator you want to add.

The window that will appear will be different if you access e-learning from the web:

Click accept and your Soldamatic will be added to the Lab, whether it is physical or in the cloud.
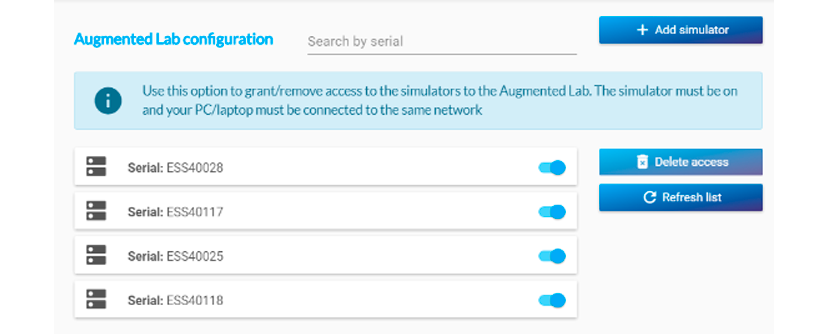
Now your Soldamatic simulators are linked to a Lab.
You can see how to install an Augmented Lab (with server on premise or cloud) in the Installation section.
Settings
Chart settings
Customise the different graphs by selecting the welding parameters you want to appear on them and the number of exercises you want to analyse.

System settings
Here you can reset the system and enable/disable the «Demo tour» option.
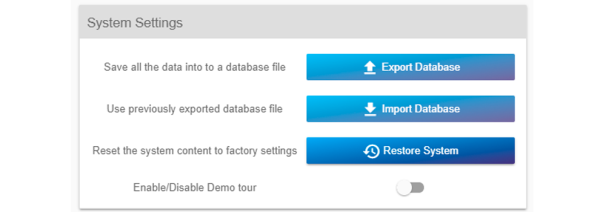
If you want to export/import your DB you should contact Soldamatic support team.
In «Restore system» you can reset the system content to factory settings.
In «Demo tour»: the first time you access your Soldamatic e-Learning, a demo tour of the application will be activated, providing you with information on the 5 main sections.

These information boxes will be displayed automatically. If you do not want them to appear, tick the message «Deactivate demo tour» and click «Exit».
If you want to re-enable it, go to the settings section:

Advanced/Industrial Welding Multijoints
All Advanced and Industrial Welding Multijoints (AWM and IWM) available in your Soldamatic licence are shown. The version of the coupon is indicated and may change if there are any modifications to the coupon.

Clicking on the «info» icon you will get the internal version of the coupon, it is only useful for technical support purposes in case Seabery requests this information.

In the «bin» icon you can delete the IWM pieces.
IMPORTANT: The AWM pieces that come by default with the software cannot be removed.
Standards settings
Select the unit system and the welding naming convention you want to work with in your Soldamatic e-Learning.

Report settings
Upload your own logo for all reports generated by Soldamatic e-Learning.

Storage Usage
This option shows the percentage of space being occupied by the videos of the Analysis Module.

NOTE: In case you have more than one simulator, the serial numbers of all simulators will be displayed.
Use this option if you want to free up your simulator data base space.
To do so, click on ‘Archive and delete execution files’.

The following screen will be displayed.

1. Courses: Select the course from which you want to archive and delete the exercise executions.
2. Start date/End date: select a day or a range of time where you have performed the exercises you want to archive and delete.
3. All students enrolled in the selected course will be displayed as well as the exercises they have completed and the size of the files. The progress shows the status of the file download.
4. Total size of the files to be exported.
Click on Start and a zip. file will be downloaded in your laptop/PC.
IMPORTANT: Once you have downloaded the exercises video executions, you will not be able to import them again and they will not appear in your Soldamatic e-Learning. What will appear will be the record of the practices, but without the videos.
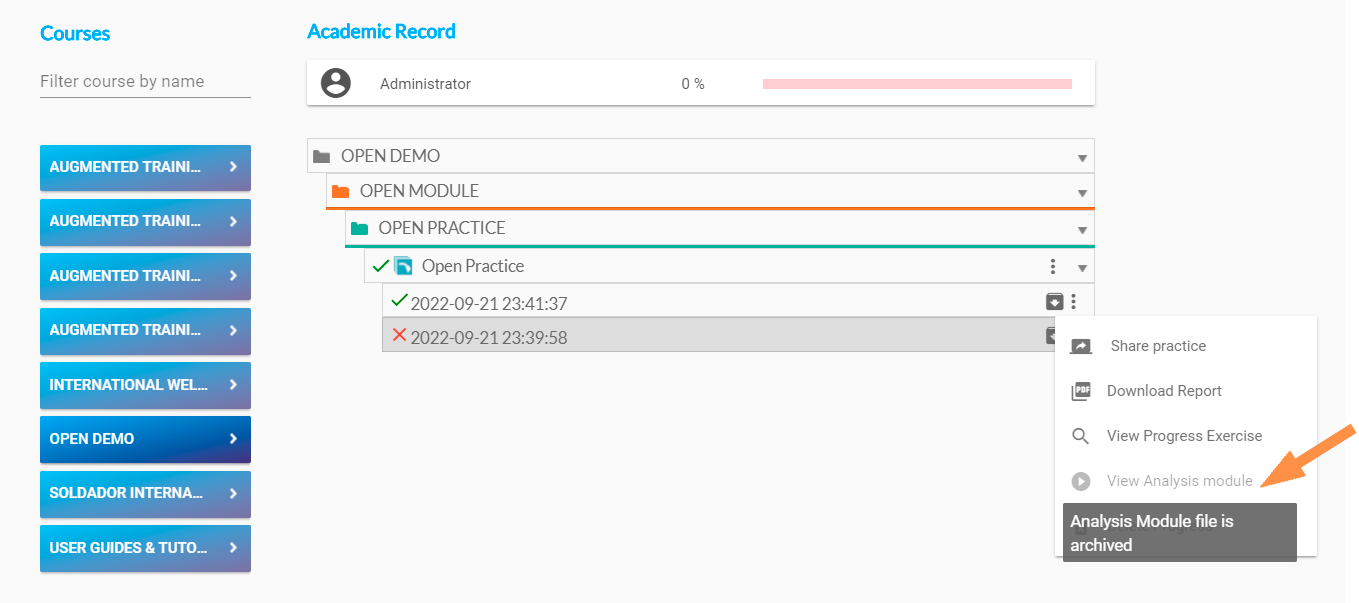
To view the videos you have downloaded, you have to download the connector available in the settings menu.
Create a Robotics’ Job
Go to «Settings» and scroll to the bottom of the page to find this option. It is located in the right column.

Click on Job and enter the Voltage (the value must be between 10 and 38 volts) and the Wire Feed Speed (the value must be between 1.3 and 25 metres/minute).

Default values will appear, you can edit them by clicking on the pencil icon.
Here you can see how to Create a robotic welding exercise.
Download Connector
You will need to download this connector to:
- Open the exported file of the Analysis Module. With this connector you will be able to visualise the exercises on your computer.
- Configure an Augmented Lab, if you do it from the web access.

Teacher’s access: Students
Create a new student
Click on the «New Student» option to create a new student.

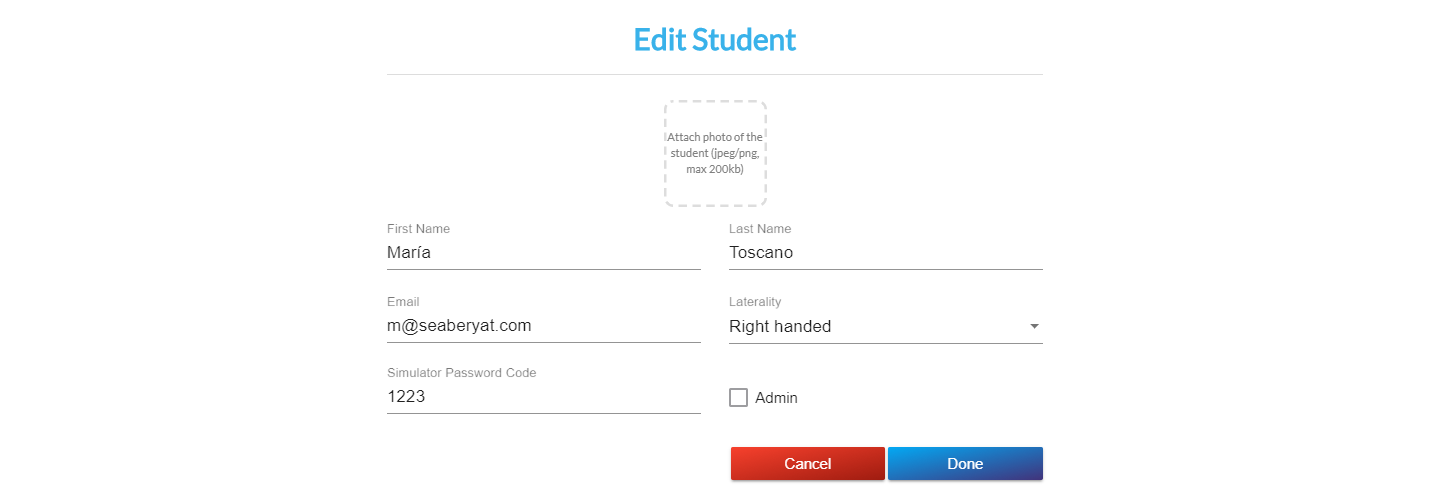
Then, the following window will appear. Fill in the personal information of the new student:
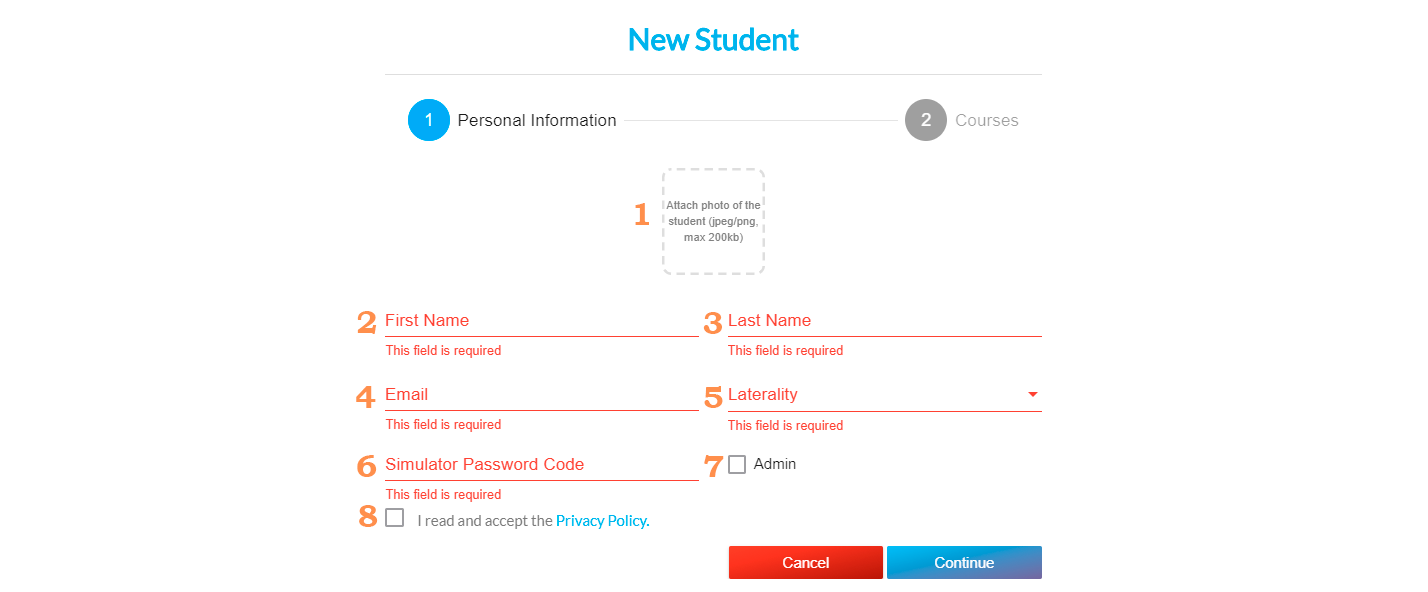
All fields in red are required.
1. Add a photo of the student (optional).
2. First name.
3. Last name.
4. Email.
5. Laterality: right-handed or left-handed.
6. Simulator password code: this password allows the student to access to their profile in the simulator. You must enter a 4 alphanumeric characters password [0-9 A-Z].
7. Admin: This option to grant administrative rights to the student, which means he/she will be able to access to the simulator settings menu and other extra options. We highly recommend you not to grant administrative rights to students.
8. Privacy policy: if you do not accept the terms and conditions of the privacy policy you will not be able to continue with the creation of the new student.
Click on «Continue».
The next step is to select the courses you want your new student to enrol in. Do this by enabling the checkbox on those courses you want to enrol the student in.
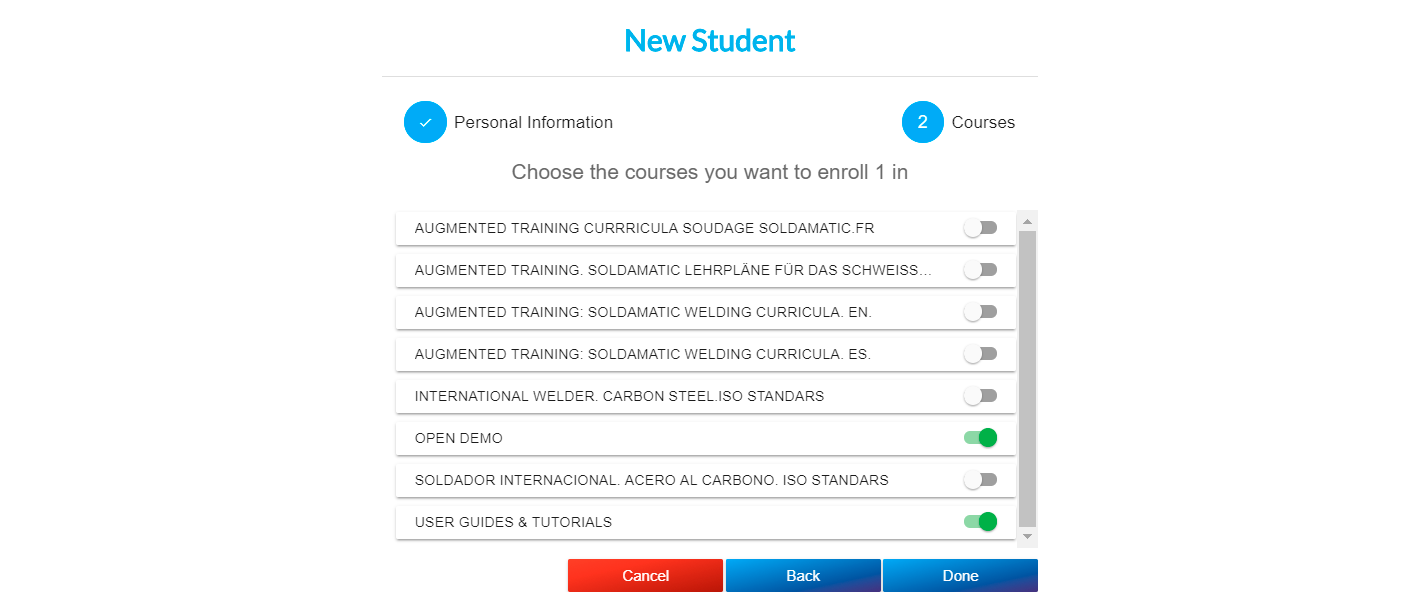
This can be edited as many times as you want, so you can enrol your students in new courses later, quit them, etc.
If you do not enroll your student in any course, it will be enrolled in two default courses «OPEN DEMO» and «GUIDES».
Click on «Done» to save your student or «Cancel» to exit without saving.
Export/import students
Follow these steps to export and import a students’ list in Soldamatic e-Learning:
First, click on the ‘Export’ option to get the Excel template you need to import your students’ list. This is done in order to work on a template compatible with our e-Learning.
It is essential that this file has the CSV extension.

Now, open Excel and select a blank workbook.

Click on Data and select the option «From Text/CSV».

Select the file you downloaded from Soldamatic e-Learning.

Click on ‘Load’ to get an editable table.
Note that only some columns have a * at the beginning, meaning that this information is absolutely necessary. The rest of the columns will be stored by the system itself.

Once you have completed the template with all your students, save the file as a «comma delimited CSV». You can rename it and name it as you wish.

Press ‘OK’ in the message displayed on the Excel program.
Next, we have to find this file and open it with windows notepad because normally it will save it with semicolons.

It is essential that these semicolons are replaced by commas, otherwise Soldamatic e-Learning will not recognise the file.

To do this, click on «Edit» and then on «Replace». Now replace all semicolons with commas. Check that all the semicolons are gone and that we only have commas. Save the file.

Click on ‘Import Students’ in Soldamatic e-Learning and select the .csv file you have previously created.

Soldamatic e-Learning will display a message showing the number of new students to be imported.

Click on ‘Import’ and on ‘Done’ to complete the process. We will see the new students in this list.
Search filters
In the search filters option we can perform the following actions:

1. Search by completed course: you will be able to see the students who have completed the selected course(s).
2. Search by state: active or non-active. Non-active students will not be shown in the simulator, but you will have them here to register them whenever you wish in any course.
3. Search by name: if you want to search for a specific student, just add their first or last name here.
4. Search by course: you can select any of the courses and view the enrolled students.
5. Search by progress: this can be high, most of the course has been completed; medium, half of the course has been completed; and low, the student has only started the course.
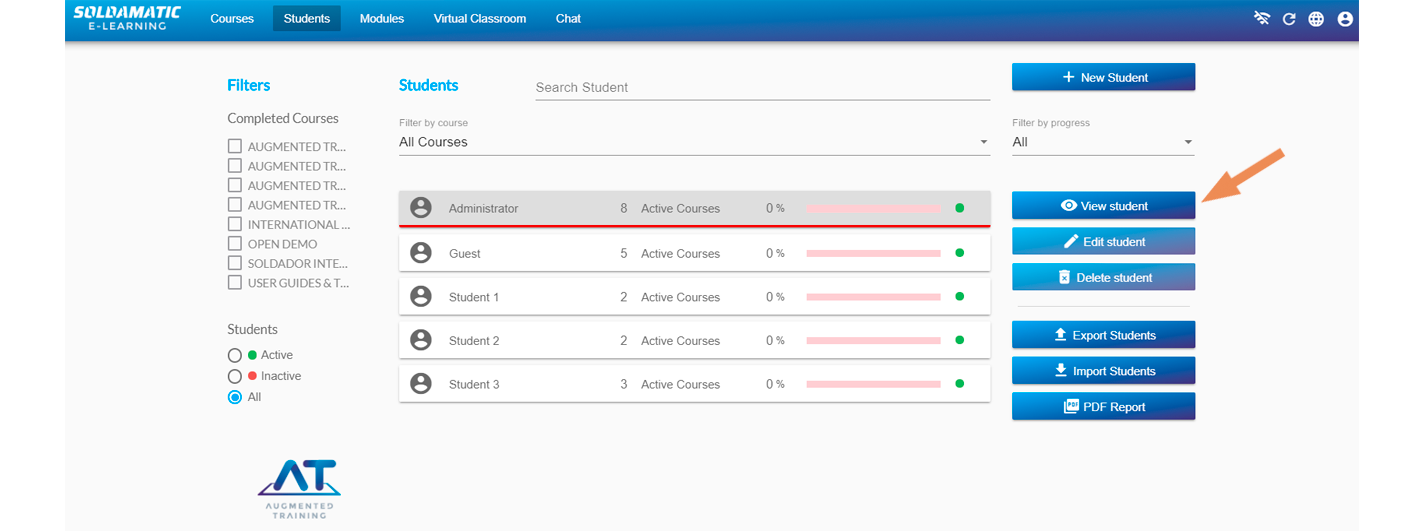
View student
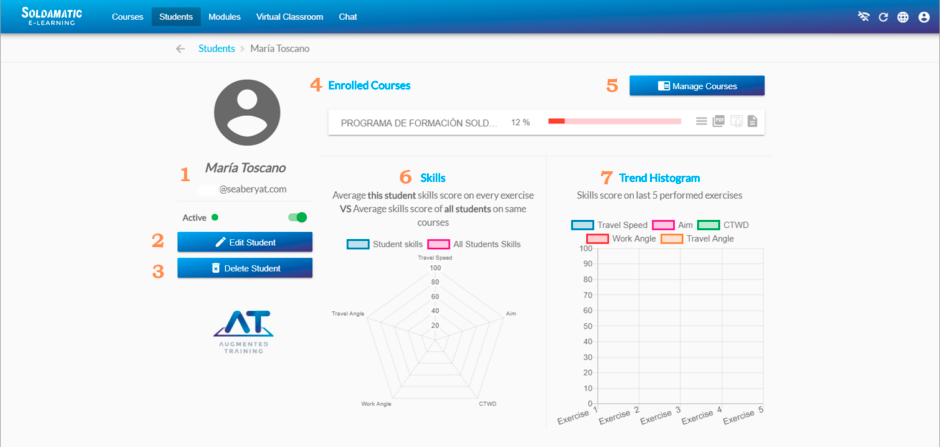
Access to this screen by selecting the option «View student» or by double clicking on a student from the main list.

Once you access «view student» you will find the following screen:


Edit/delete student
As we have seen, in the view student option we can edit or delete it, but we can also perform these actions in the main screen.

1. Edit the student’s personal information.
2. Delete the student from Soldamatic e-Learning. Information will no longer recovered.

IMPORTANT: Admin and guest students cannot be edited or deleted.
Results and exercise analysis
In the students’ section of e-Learning, select «View student» on the student whose exercise information you want to see.
Once in their profile, access the course of your choice, then click on the exercise you want to access and select «Records» in the three horizontal lines on the right.

You will find the following screen:

1. Get a Histogram Report of a whole Didactic Unit. It shows graphically the student’s overall score regarding the technical parameters a welding practice includes.

2. Click on a welding performance. You will be able to perform the following actions:

In the simulator, the shared practice will appear like this:

To share a practice, click on the option «Share Practice».

b. Download report: download different reports to record all the exercise data. See Reports section.
c. View Progress: this option shows general information of the exercise. Add any observation about it so that the student can see it in the exercise report via e-Learning.

d. View Analysis Module: here you will see the following information:
IMPORTANT: You must download the connector to be able to open the file.
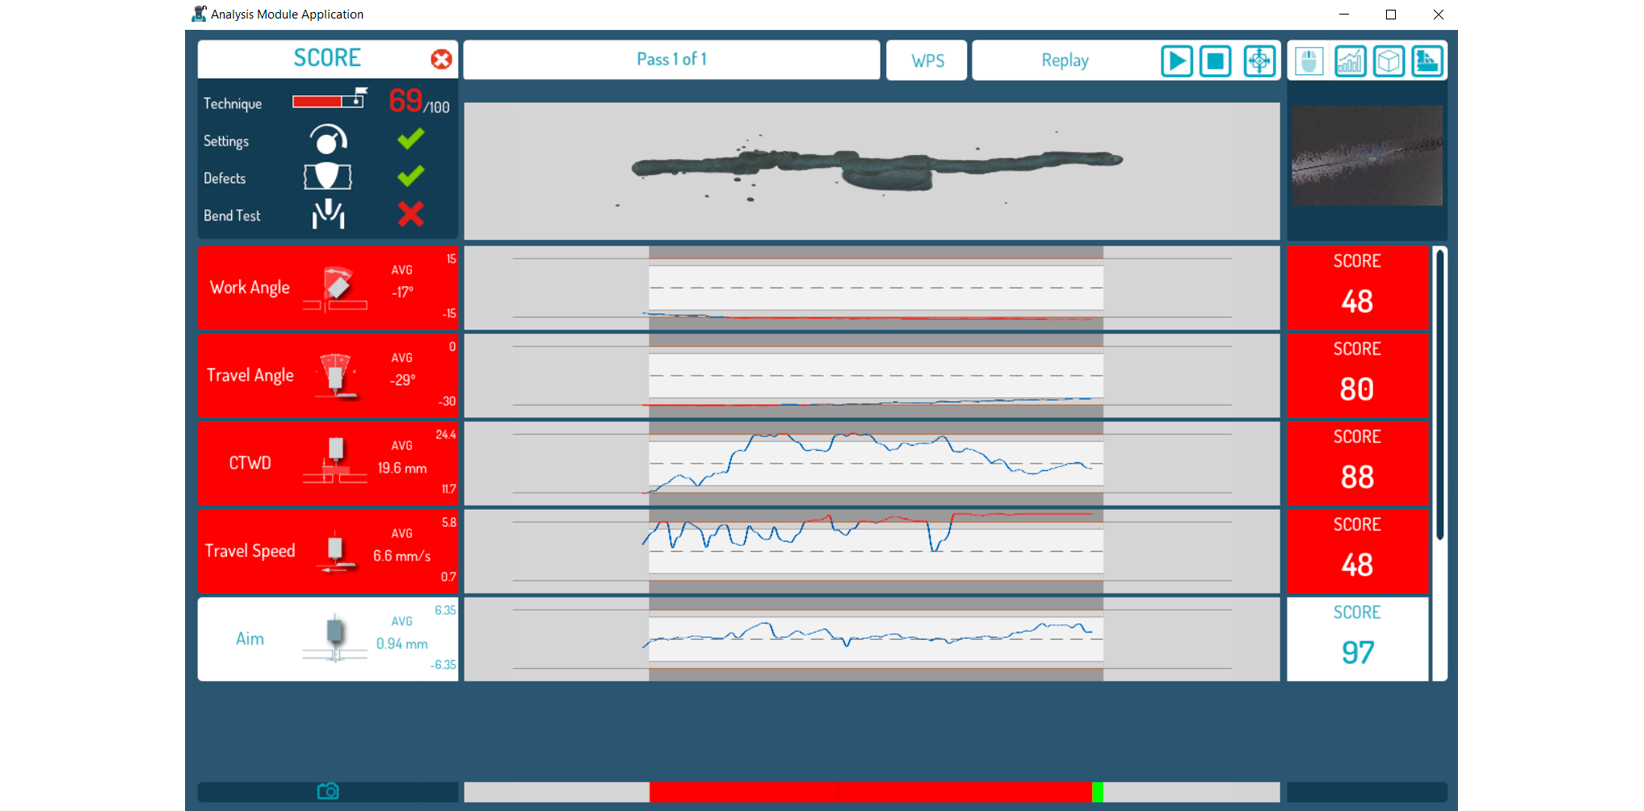
If the performance has been archived, it is not possible to download it. A popup will appear over the view analysis module button indicating that the performance has been archived.
Go to Soldamatic Results and exercise analysis to see the information displayed in the interface.
e. Delete progress.
Teacher’s access: Modules
Module structure
Before adding any content, it is important to understand the relationship between courses, modules, and units.

Adding modules
Select the option «New Module» to add a new module.

Next, the following window will appear:

1. Module Name: this field is required.
2. Description: this field is optional.
Click on «Save Module» and your new module will be automatically added to general list on the right side of the screen.

a. Use this symbol to add new units to your module.
b. Click on this symbol to display the following options.

Modules are represented by orange folders and you can create as many as you need for the course.
Adding new units

Click on the plus symbol to create a new unit.

Units are represented by green folders and you can create as many as you need for the module.
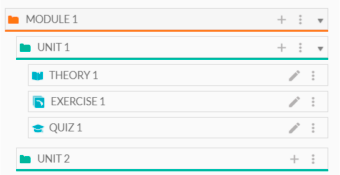
Your new unit will appear under the module.
Adding theory

Now click on the plus symbol to start adding tasks (exercise, theory, quiz) to your unit.

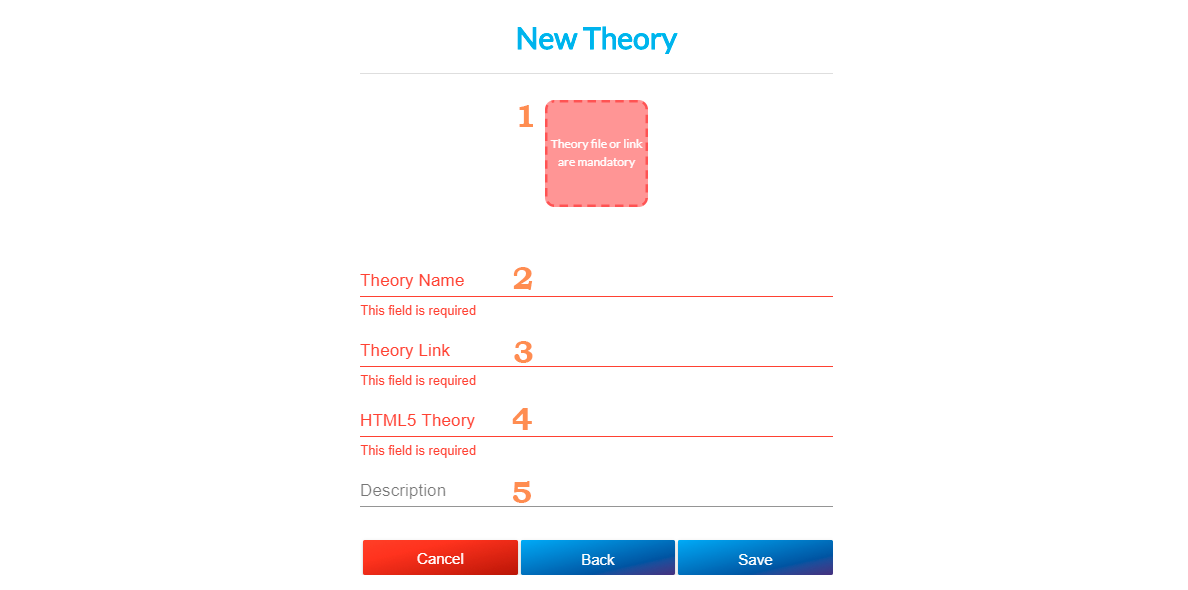
We can add as many theory files as we want to this Unit in the 3 formats we have seen.
Once the theory tasks have been created you also have the option to view and download the file, if it is in pdf; and the option to copy and delete the theory in any format you have used.

Adding welding exercise
To add an exercise click on the + symbol of the Unit.

Select the «Exercise» option to start designing your manual welding practice or the «Robotic Exercise» if you want to perform a robotic welding exercise.
If you want to create an exercise with an AWM or IWM piece, follow the same steps.
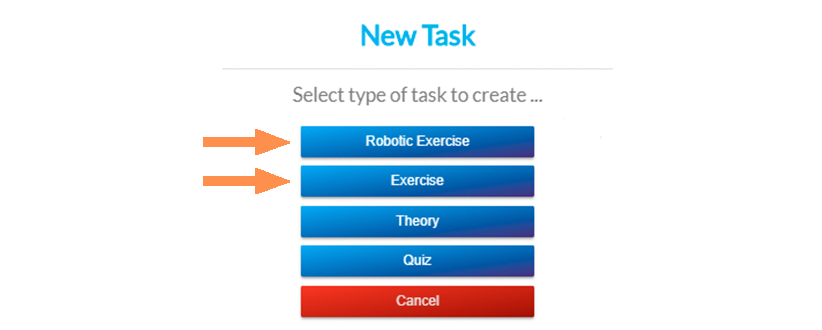
If you choose Exercise, you will have to select Uniprocess ot Multiprocess.

Once selected, screen 1 «General Info» of the exercise setup will appear.
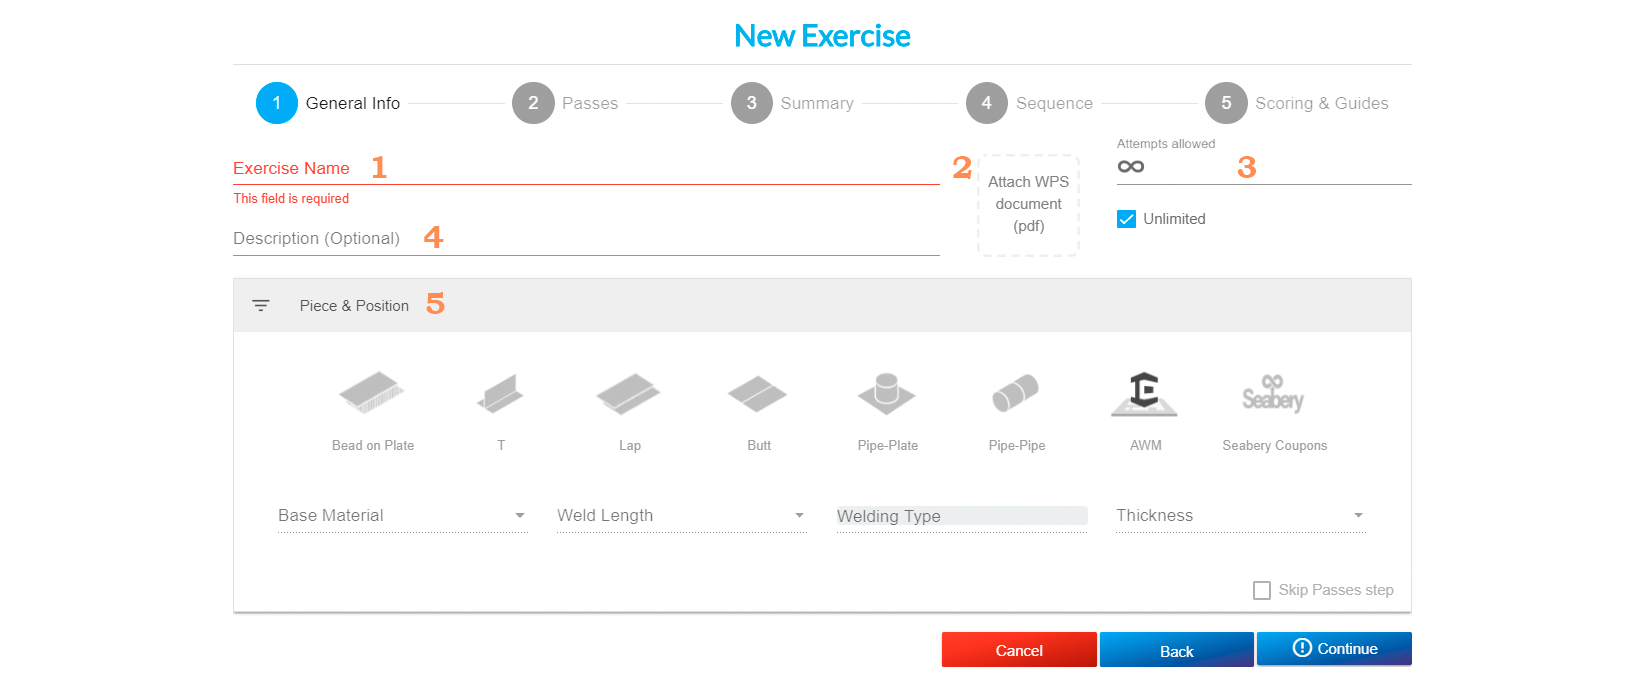
1. Exercise name: it is recommended that the title be sufficiently descriptive of the type of exercise so that the learner can identify it in the simulator, as the title will be the only thing the learner sees about the exercise before accessing it (required).
5. Piece & Position: once you select your piece, welding positions will be displayed. Select the desired welding position. If you want to perform an exercise with an AWM or IWM pieces, see screen 3.


Make sure you tick both piece and position, otherwise you will not be able to select the next parameters.
a. Base Material.
b. Weld length: you can select one of the available sizes leaving this parameter closed or select «open», allowing the student to choose the length of the welding bead in the simulator.
c. Type of weld. Default field.
d. Thickness of the part: you can select one of the available measures leaving this parameter closed or selecting «open», allowing the student to choose the thickness in the simulator.
Press «Continue» and the screen 2 «Passes» will appear.

1. Passes: this shows the number of passes your exercise has.
2. Difficulty: by default, it will appear at the beginner level. We will be able to choose between the following levels: beginner, intermediate and advanced.
3. Copy pass: once your pass is completed, you can copy all the parameters values in another pass.
4. Remove pass: you have the option to delete the pass you have created.
5. Add pass: once you have finished completing a pass, select this option to add a new one. You can design up to 3 passes except from the bead and plate in which you can perform 4 passes.
6. Process > Filler > Gas: select the welding process to unlock both the filler material, its diameter and gas type for the processes that require it.
When there is no choice, the field will be filled automatically.
IMPORTANT: Make sure these fields are filled, otherwise you could not continue designing your pass.
7. Pattern > Weld Segment: select the pattern (straight, triangular, circular, zigzag or rolling) and then the weldment segments will be unlock (continuous, 2 segments or 3 segments).

8. If you are creating a «Robotics» exercise, you will be able to select the direction: Left to Right, or Right to Left.
9. Equipment Settings: this screen appears only when all the above parameters are selected. The values that will appear are given by default (they are marked in green), but you can modify them if you wish.

Changed values will be marked in blue. If you want to reset values, click on the reset icon. Click on the lock symbol to determine wire feed speed range based on voltage settings.
These values would also vary in case you change the difficulty level.
For GMAW and FCAW welding processes you can set the transfer mode, which can be short-circuit, globular, spray or let it be automatic.


You can configure the polarity and the amperage in SMAW welding exercises.

10. If you are creating a «Robotics», once you have configured all the parameters, you can Create a new Job.

- Enter the Voltage, the value must be between 10 and 38 volts.
- Enter the wire feed speed, the value should be between 1.3 and 25.4 metres/minute.
Press Save. You will see the Job created in this list. From here you can Edit, Delete or create a New one.
11. Technique Parameters: this screen appears only when all the above parameters are selected. The values that will appear are given by default (they are marked in green), but you can modify them if you wish.
Changed values will be marked in blue. If you want to reset values, click on the reset icon.
These values would also vary in case you change the difficulty level.

Click on the icons to get a definition of the different parameters.


Click Continue and you will be in screen 3 «Summary» where you can review all the selected parameters.

If you want to edit the parameters chosen in the previous screens you can click on the edit icon, in case you want to edit the equipment settings or the technique parameters, or select «Back» for the others parameters.
When you click on the edit icon, you can change values as desired or use the default values by clicking on the option «Use default values». Then, save your changes or cancel.

If you have chosen a multi-joint piece most of the parameters are defined by default.

You can double-click on the coupon to have a 3D view of the different welds that compose it. Select the stage you want to weld in the simulator.

If you want to edit the parameters, you can click on the pencil, in case you want to edit the equipment configuration or the technique parameters. Select «Back» to change parts or «Continue» to save.
Click Continue and you will see the next screen 4 «Sequence» which will appear only for certain multi-joint piece.
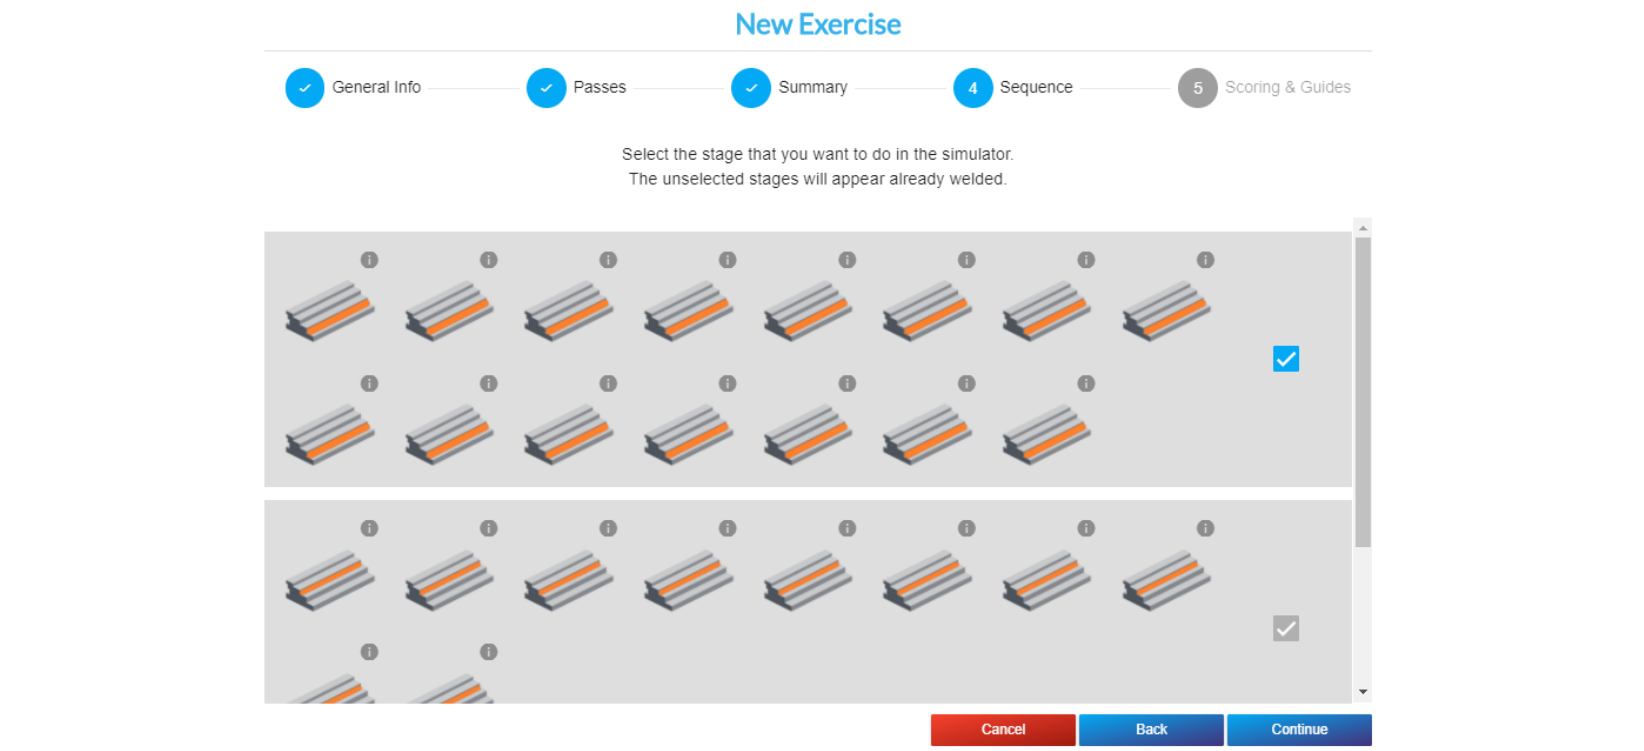
For other pieces, you will go directly to screen 5 «Scoring and Guides».

1. Scoring.

NOTE: You can set the option to restart the pass during exercises with more than one pass. The student can restart the weld bead at any time by pressing the Cancel button
2. Real-Time guide parameters: select the help icons you want to be displayed during the exercise.

NOTE
During GMAW and FCAW welding practice, the advanced torch will vibrate more intensely than normal if any of these parameters are infringed: arc speed, arc angle or arc distance. This option will be enabled by default, you can disable it if you wish.
Click on Done to save your exercise.
Once your exercise is created, it will appear below your unit title. You can edit it, copy it, or delete it.

Adding quiz
To add a quiz, click on the + symbol

Then click on quiz.

The following window will appear:

1. Quiz name. (required).
2. Description: you can add information about the exam (optional).
Click on Continue.

Click on the «+» icon to start adding questions to your exam. You can add a maximum of 20 questions to this exam.

1. Question: you can add a question with a maximum of 150 characters (required).
2. Explanation: add here, if you wish, a clarification to the answer. It will be visible only after the student’s answer.
3. Answer: you can add an answer with a maximum of 135 characters. Once the first answer is created, a + symbol will appear next to «Answers for this question». There must be at least two answers and it is mandatory to mark at least one as correct by ticking the checkbox (required).
The quiz can be single or multiple choice.
Click on «Save question» and keep adding questions to your quiz.

Once completed, click on «Save all» and the exam will appear within the unit. You can copy it, edit it or delete it.

Adding content to the module
Choose in the left column for the item you want to copy: a whole unit, or an assignment: exercise, theory or exam.

Click on the arrow on the right to display the contents of the module. Select the content and drag it to the right column to add it.
You can modify the order in which this content appears dragging it to the position you want.
Export/import modules
It is very easy to export a module. Just click on the export icon in the module options.

You will get a file containing all the information of the module.
IMPORTANT: Default modules cannot be exported.
To import a module, click on the «Import Module» option:

Just select the file you got from the export and the module will appear in the List of modules.
REMEMBER: Do not modify the exported file in any way.
Teacher’s access: Courses
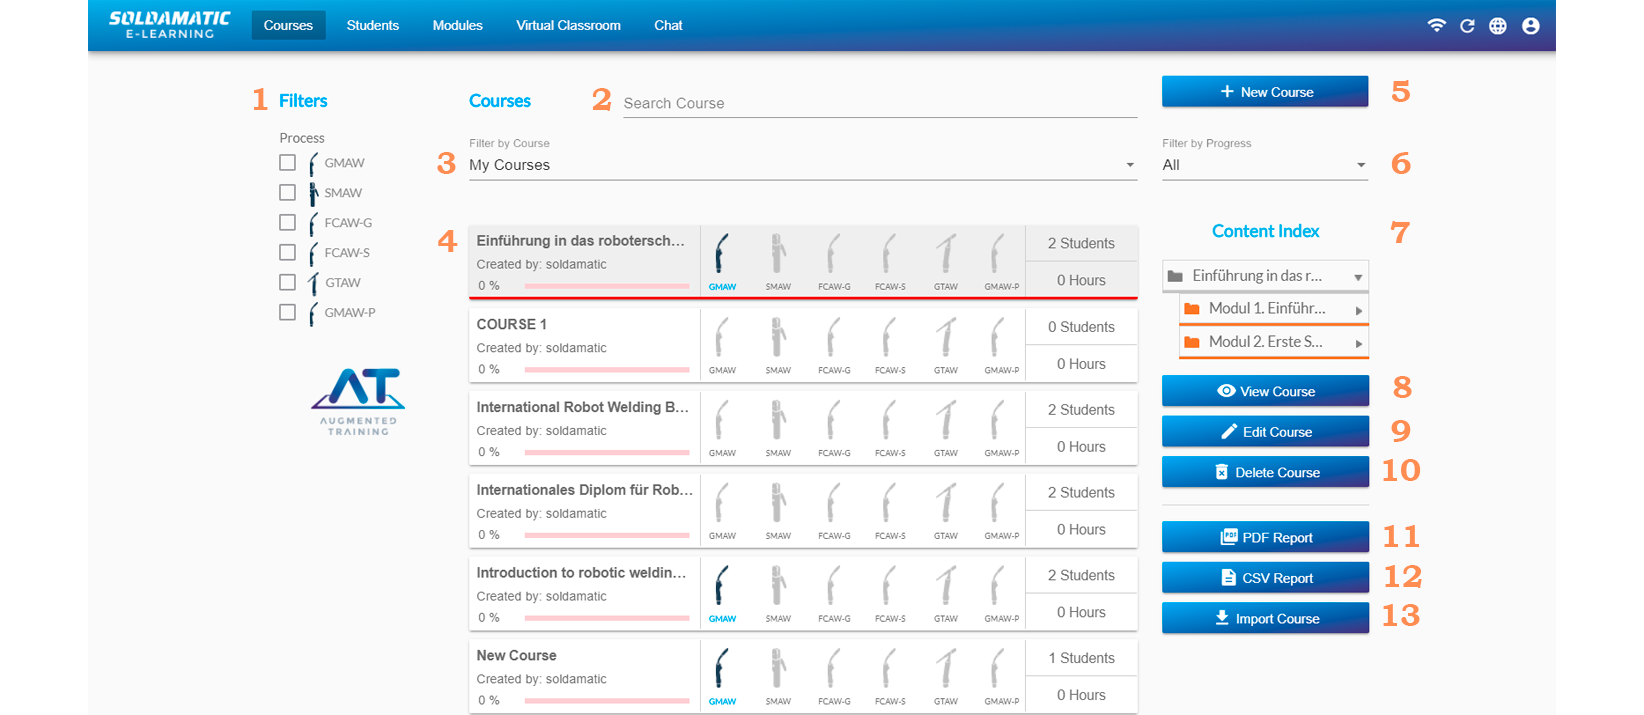
1. Welding process filters: click on one or more processes to find courses that include exercises in the selected processes.
2. Type a course name to search for it.
3. Filter by Course: displays all courses or only those created by the instructor.
4. Courses list: the courses will be displayed according to the selected filters.
Default and licensed courses cannot be edited or deleted.
11. PDF report: click on a course from the main list to get a .pdf report. We will go into more detail in Teacher’s access: Reports section.
12. CSV report: click on a course from the main list to get a .csv report. We will go into more detail in Teacher’s access: Reports section.
13. Import course: click here to import a course.
You can only import files generated by the system. See section Export course.
Adding a new course
Select the option New Course

The following window will appears:

1. Course name (required).
2. Start date (optional).
3. End date (optional).
4. Description (optional).
5. Durantion (optional).
6. Visible: enable this option if you want this new course to appear in the simulator. If you disable it, it will not be visible to the learner in the simulator or on the e-learning platform.
Press Continue.

Choose the students you want to enroll in this new course from the list of all the students created in Soldamatic e-Learning. You can create more students later.
If the tab is in green that means your student has been successfully enrolled. A confirmation message in the upper right part of the screen will be displayed.
Press Continue.

Press Edit Content if you want to add existing modules to the new course. Drag existing modules from the left list to the right one or press the + icon.

Once you finish, go back to the Soldamatic e-Learning homepage by clicking on «Courses».

If you prefer not adding any content, press «Done» and your course will be automatically created.

View course
Select a course from the main list and press the option «View Course» to access to the course information. You can also double click on the desired course you want to open.
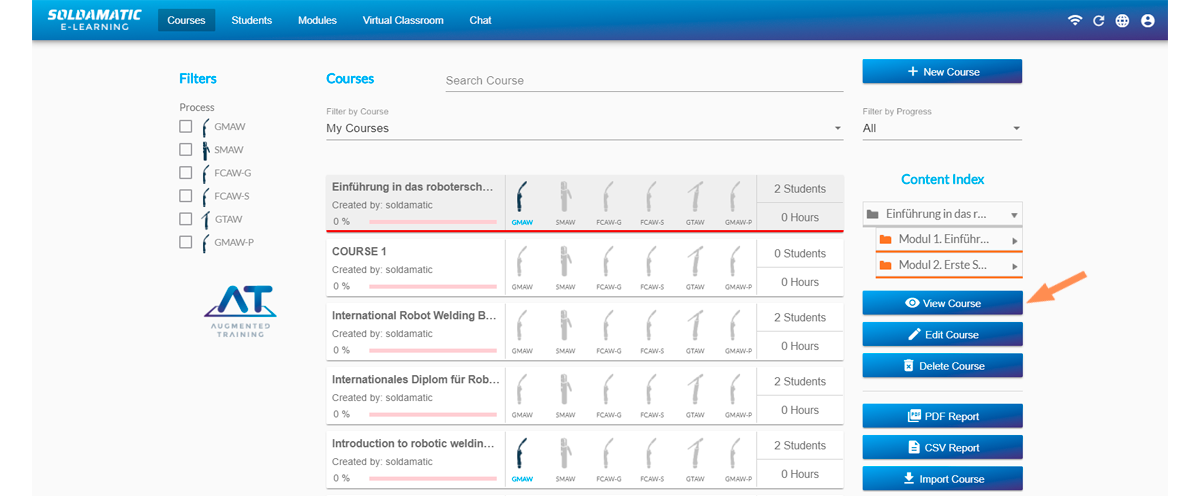
The following window will appear:
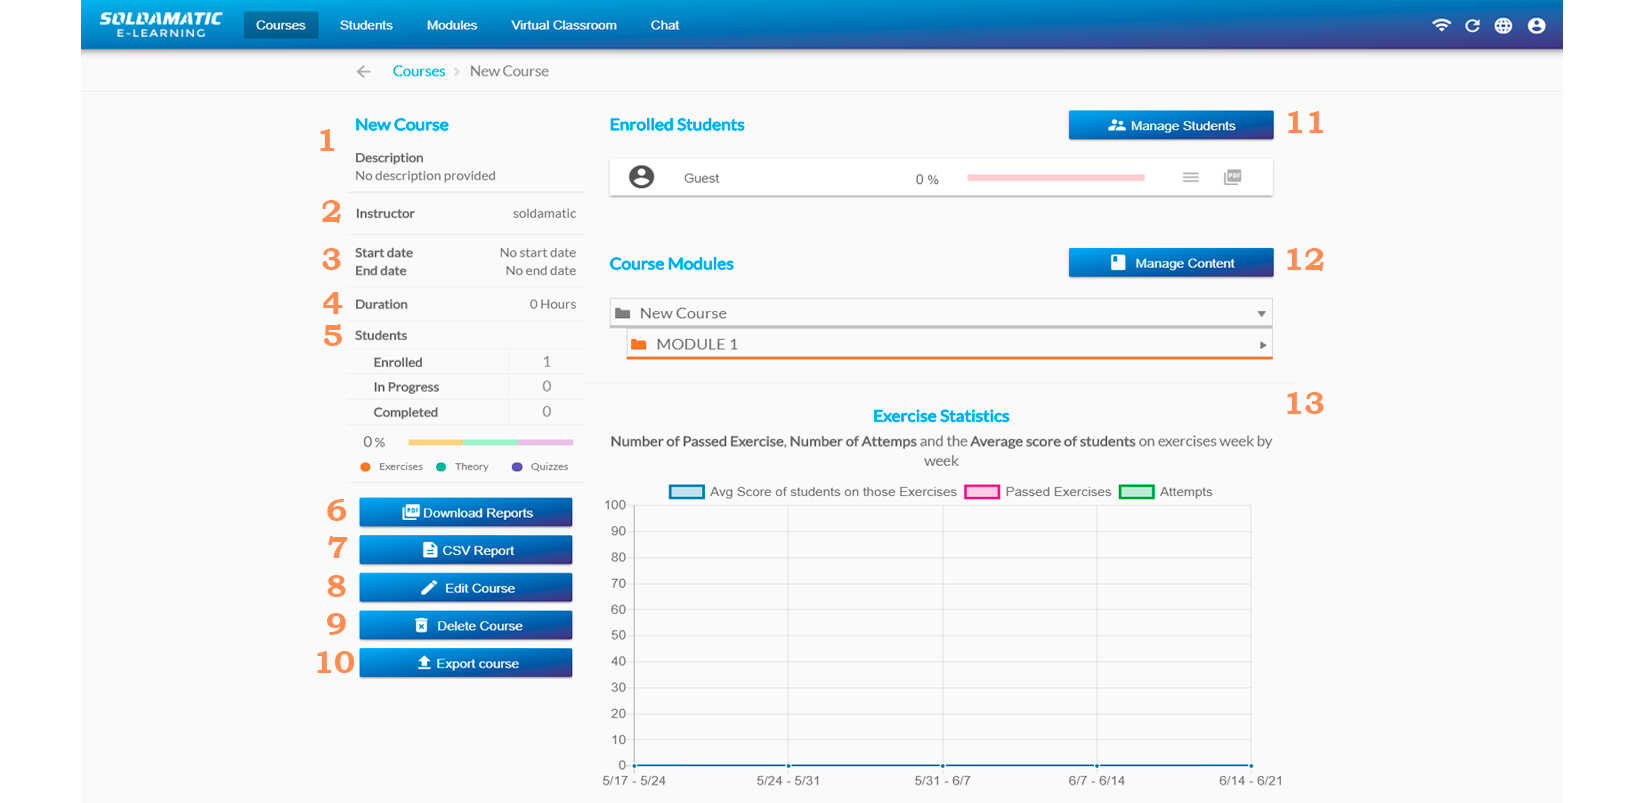
1. Course name and description.
2. Instructor’s name.
3. Course start and end dates.
4. Duration of the course.
5. Students information. This shows the number of enrolled students, if they are already doing the course and which ones have completed it.
6. Download reports: here you can get three kinds of .pdf reports: students, global o student progress. We will go into more detail in Teacher’s access: Reports section.

7. CSV report: select this option to get a .csv report. We will go into more detail in Teacher’s access: Reports section.
8. Edit course: select this option to edit the general course information. Default and purchased courses cannot be edited.

9. Delete course: select this option to delete the course. Default and purchased courses cannot be deleted.
10. Export course: use this option if you want to export your course to import it in another Soldamatic e-Learning (in case you have two separate simulators) or just to back it up.
Default and licensed courses cannot be edited or deleted.
11. Manage students. The following window will appear:

a. Type the name of the student you want to search for.
b. Use this filter to look for the students that are enrolled in your course and the students that are included in Soldamatic e-learning but not enrolled in your course. You can also select «All students» (enrolled/not enrolled).
c. Use this list to enroll or disenroll your students by enabling or disenabling the tab.
12. Manage content: add or delete contents. To add contents drag existing modules from the left list to the right one or press the + symbol. To delete content click on the bin icon.

Once you finish, go back to the course view by clicking on your course name.

13. Exercise Statistics: this graphic provides information about the average score of the exercises performed in the time range showcased in the horizontal line of the graph; all the passed exercise and the different attempts students have performed.
Teacher’s access: Virtual classroom/Chat
Virtual classroom
Here you can monitor in real time the internships being carried out by the students (it is possible to see everyone who is doing a welding internship at Soldamatic at that moment).
NOTE: You must be connected to the simulator or server to see them.
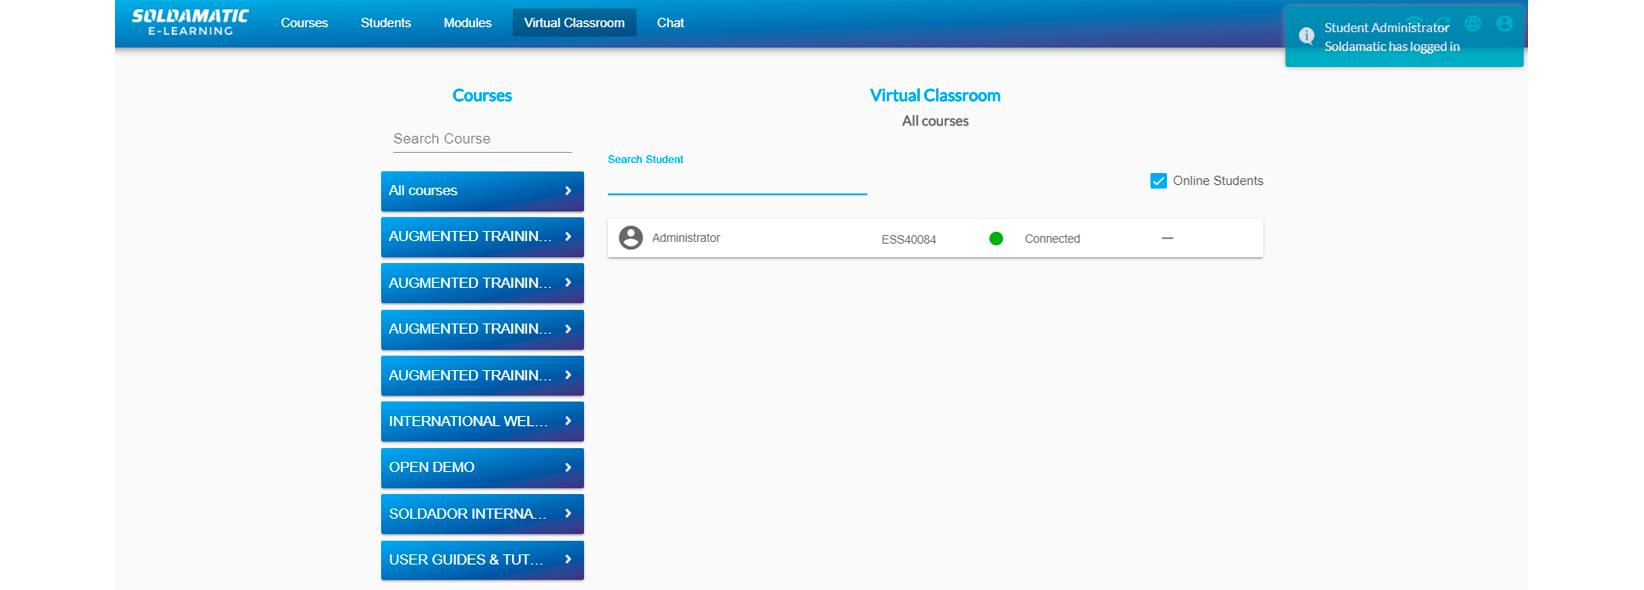
Search for the course you wish to monitor and select it. The list of online students will be displayed. If you want offline students to be displayed, uncheck the box.
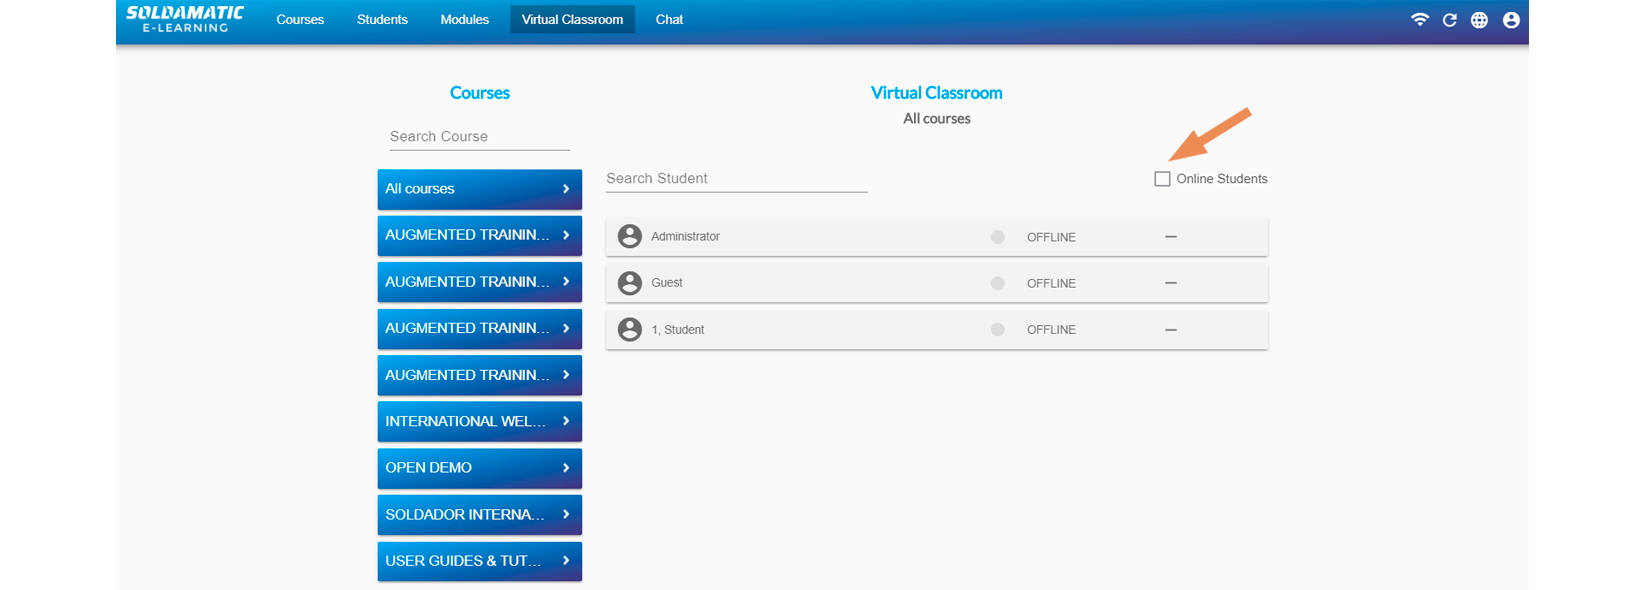
IMPORTANT: A notification will appear in the top right corner to indicate the on/off status of the student.
You can see in real time the information of the exercise the student is doing.
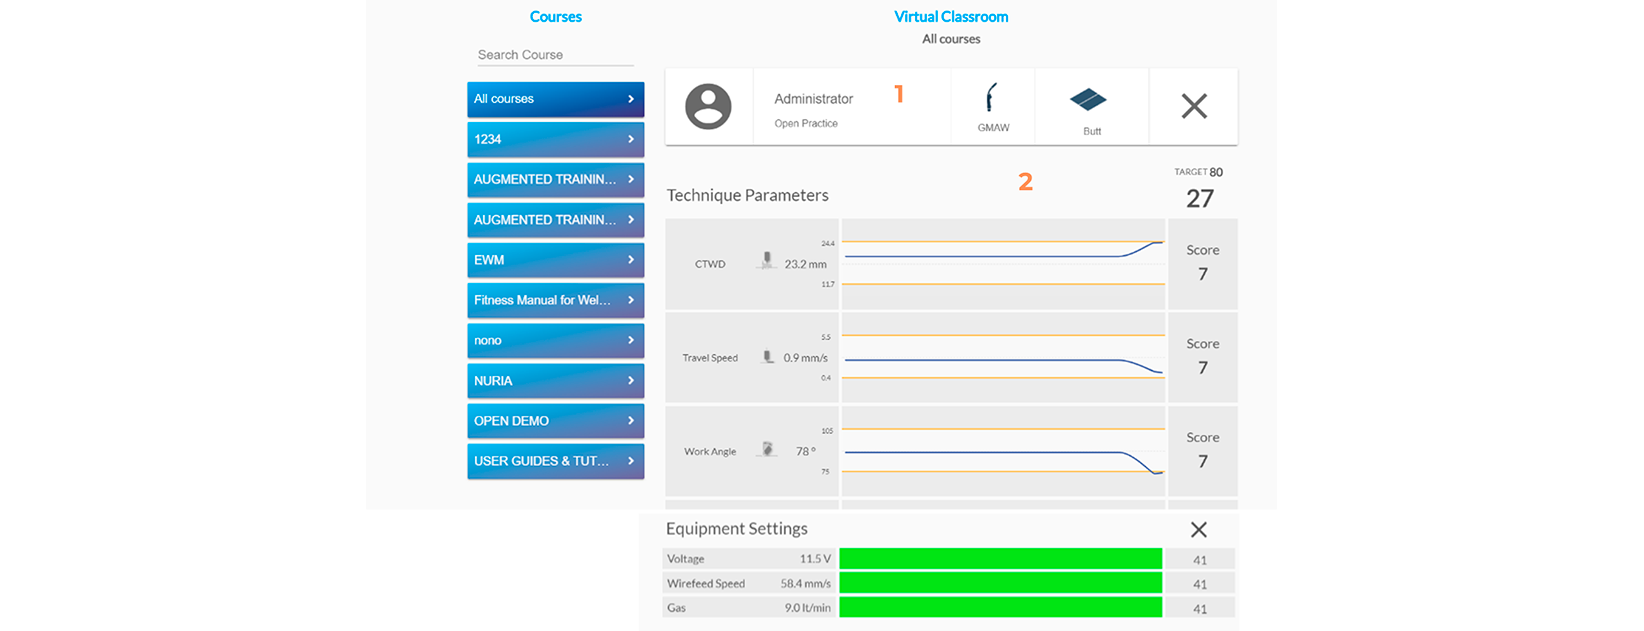
1. Name of the student, welding process and exercise piece.
2. It shows in real time the progress and the score of the different parameters during the exercise.
Virtual classroom
You can also view live video of the student’s practice in real time using the «Shareview» option.

On accessing a live video of the student’s performance will be shown on the screen. Each video has the serial number of the simulator with which the welding exercise is being performed.
IMPORTANT: This option is only available if you are connected to a simulator or server on premise.
Chat
Access the chat and click on the button just above the list of students.

Type Something. Message to be sent.
NOTE: Offline messages. It is not necessary to have internet connection to send messages. As soon as the connection is activated, messages will be sent.
Broadcast list. The teacher can send messages to a group of students. The message is sent to all recipients. If you are offline at the time of sending, the message will be sent once you are back online.

Notifications outside the chat window. You will be notified when you receive a message even if you are not in the chat. Notifications outside the chat window. You will be notified when you receive a message even if you are not in the chat.

A yellow notification appears in the chat section indicating that you have a message waiting to be read.
Teacher’s access: Reports
Course list reports
You will get this report by going to the «Courses» section and clicking on the «PDF Report» button.

You will get the following report:

- All courses in the database.
- The instructor in charge,
- The number of students enrolled.
- The simulation hours of each course.
- The status of each course.
Course reports
You will be able to obtain different kinds of reports from the course: students, global and student excersice performance. To access them you must go to «View course» of the course you want to obtain the reports.

Once in the course view you will be able to download the reports as follows:

1. Download reports: when you access you will find the following window:

a. Students: this report includes all students enrolled in the course and their status within it: not started, in progress or in progress.
b. Global: It shows an overall percentage of all technical parameters used in the welding exercises and the average practice time in AR.
c. Student Exercise Performance: Students’ progress, all assignments included in the course and their status or result.
- CSV Report: see in CSV Reports section.
Students reports
You will be able to obtain a student list report from the «Student» section, by clicking on the «PDF Report» button.

You will get the following report:

In addition, you will be able to obtain specific reports on a student by accessing their profile. You will get a detailed report of the student and a histogram.

In the next window select the PDF icon.

- Histogram of all the exercises of a Didactic Unit.
- It shows graphically the global score of the student with respect to the technical parameters of the welding practice.

Diploma
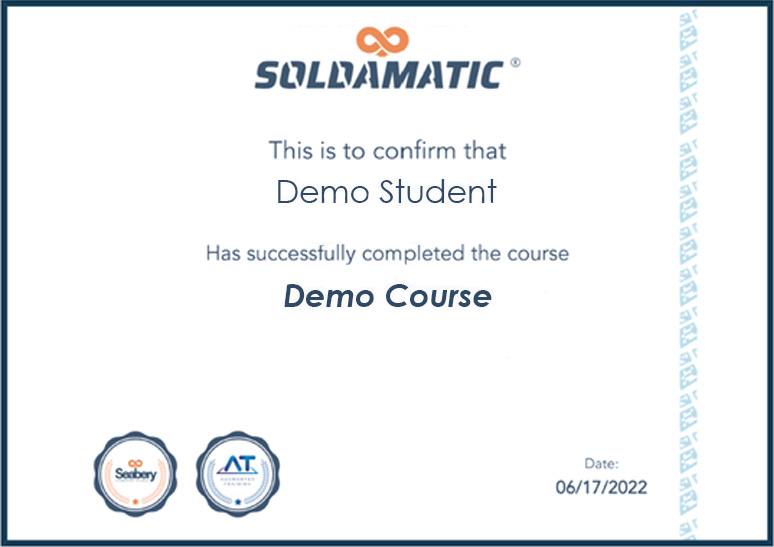
Soldamatic Diploma is available for students who complete a course. The diploma icon will be disabled in case the student has not completed the course.

Clicking on the icon, the system displays a window with the different options of the Diploma content. Configure the content of the diploma (course description, dates, content, details of exercises).
- Basic Diploma

- Extended Diploma with some information

- Extended Diploma with all the information

Click on download Diploma and you will get the pdf file:
CSV reports
You have the possibility to download all the information available in your database in order to create customised reports.
Student report
In the students section, go to «View student».

The student’s details are displayed. It is observed that for each course enrolled, a new button is shown for the export of data in csv.

Click on the «CSV Report» button on a course in which the student has done some progress. A pop-up is displayed allowing you to select the data of all attempts or the last attempt.

Click on the «Create Button» and save the file. The content is as follows (info of the selected student):
- Common of students info
- Quiz
- Theory
- Practice
Course report
In the course section, go to «View Course».

Select a course that has students enrolled and have made some progress on the course. It is shown in detail of the course. A button called «CSV Report» is displayed in the left panel button panel.

Click on the «CSV Report» button and save the file.
A popup is displayed to save the file. The content is as follows:
- Common of students info
- Quiz
- Theory
- Practice
Database report
In the course section, go to «CSV Report» button.

A pop-up window is displayed allowing you to select the courses whose data you want to appear in the report.

Select all the courses you want and click on «Create». You will get the report with all the information of all the students enrolled in each course.
Students’ access
Platform access
The Soldamatic e-Learning platform allows the students to access the theorical content. In addition, they can perform quiz and review their welding practices to detect their weaknesses and strengths.
NOTE: To start using your Soldamatic e-Learning Student’s Access, your laptop/PC must be connected to the same network as your simulator or server.
To access as a student for the first time, open your browser and type:
a. If you have a server on premise or single simulator:
- If the server or the simulator is connected to a Soldamatic Network, your access IP will be: http://11.0.0.1
- If the server or the simulator is connected to your own network, your access IP will be http://ip (check IP in the info menu on the server or simulator). For example: http://192.108.6.5. In both cases, first, choose «Student access».

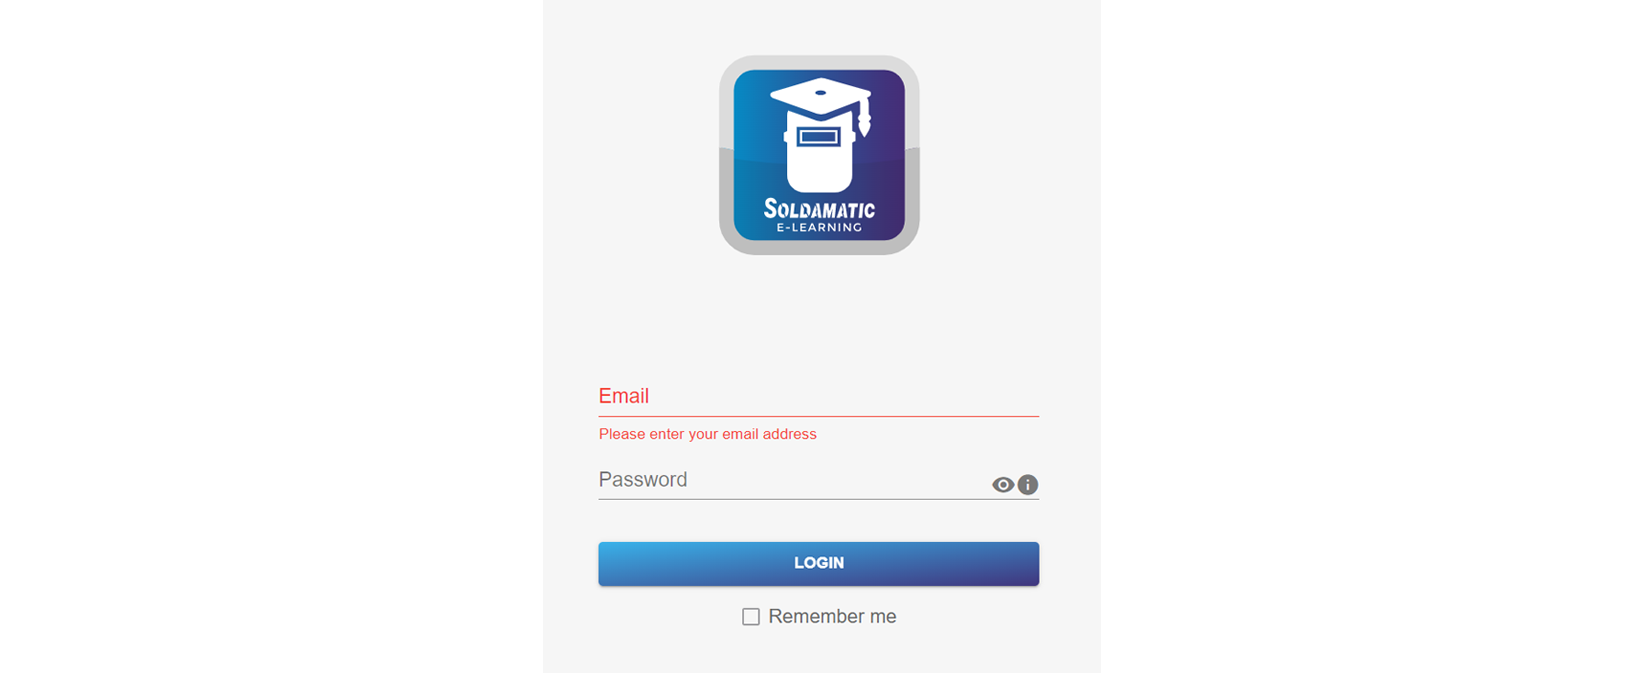
Then, enter your credentials.
b. If you want to access the cloud:
- Type in your browser: lms.soldamatic.com.
Remember to register the student through Soldamatic e-Learning (Teacher Access) and provide him/her with the access credentials.
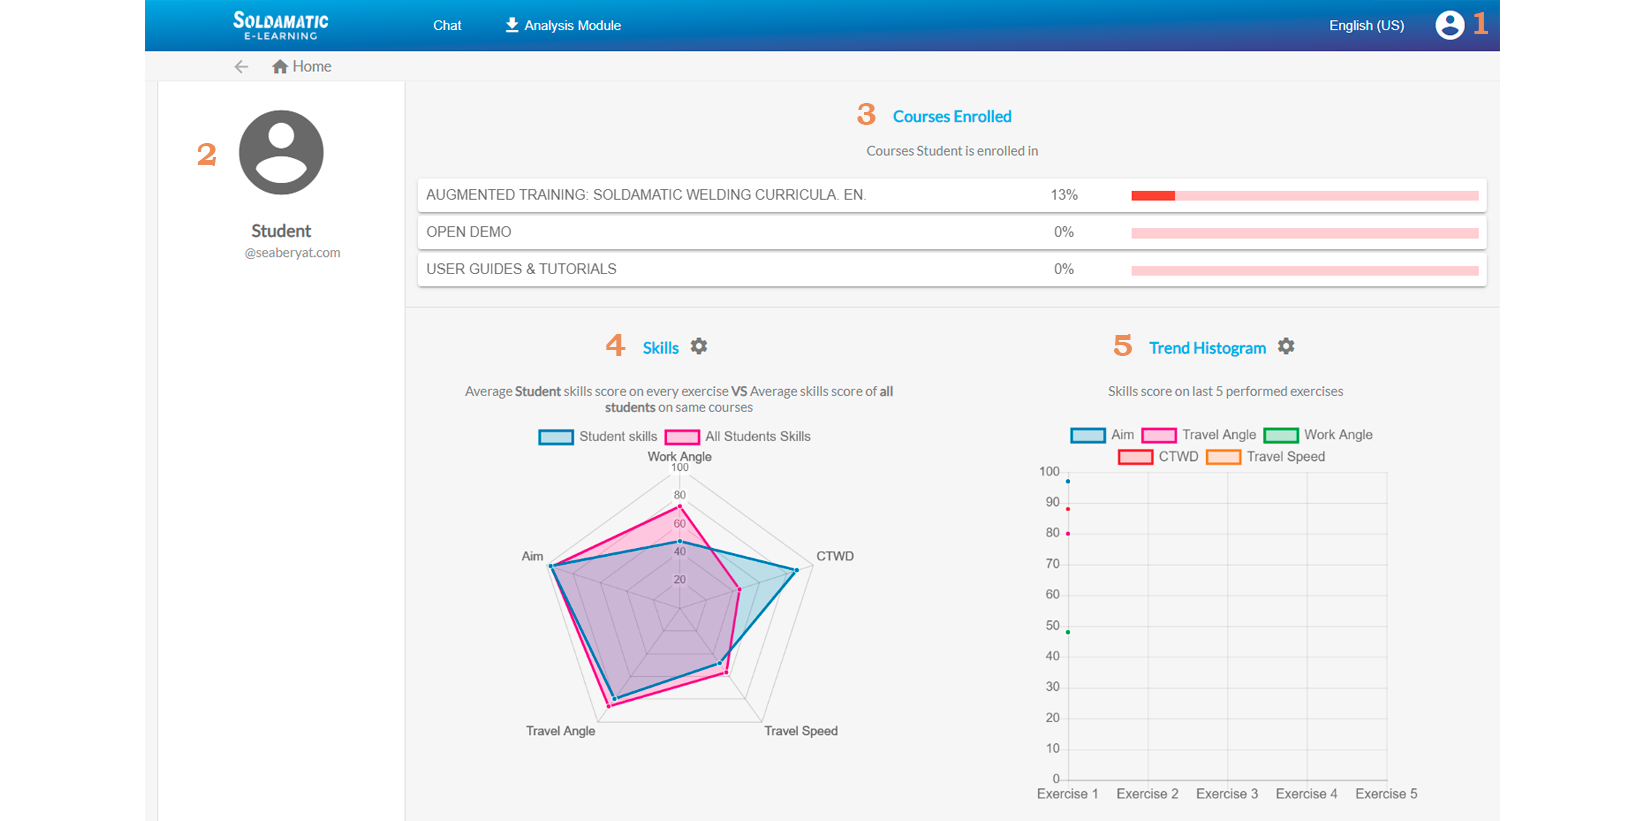
1. Here you can change the language.


Academic Record
Click on the content you want to view. You will be able to see theory and quizzes.

Once you have completed the questionnaire, your score will be displayed..

If you have done some welding practice in the simulator, you can review your exercise on this platform. Download and install the Analysis Module application to view it.

Click on the «cloud» icon to view the welding practice video.

Chat
The platform allows an interaction between the instructor and the student through a chatting system, that means that the learning process is always active.
You can select the instructor or partner you want to chat with from the list on the left.
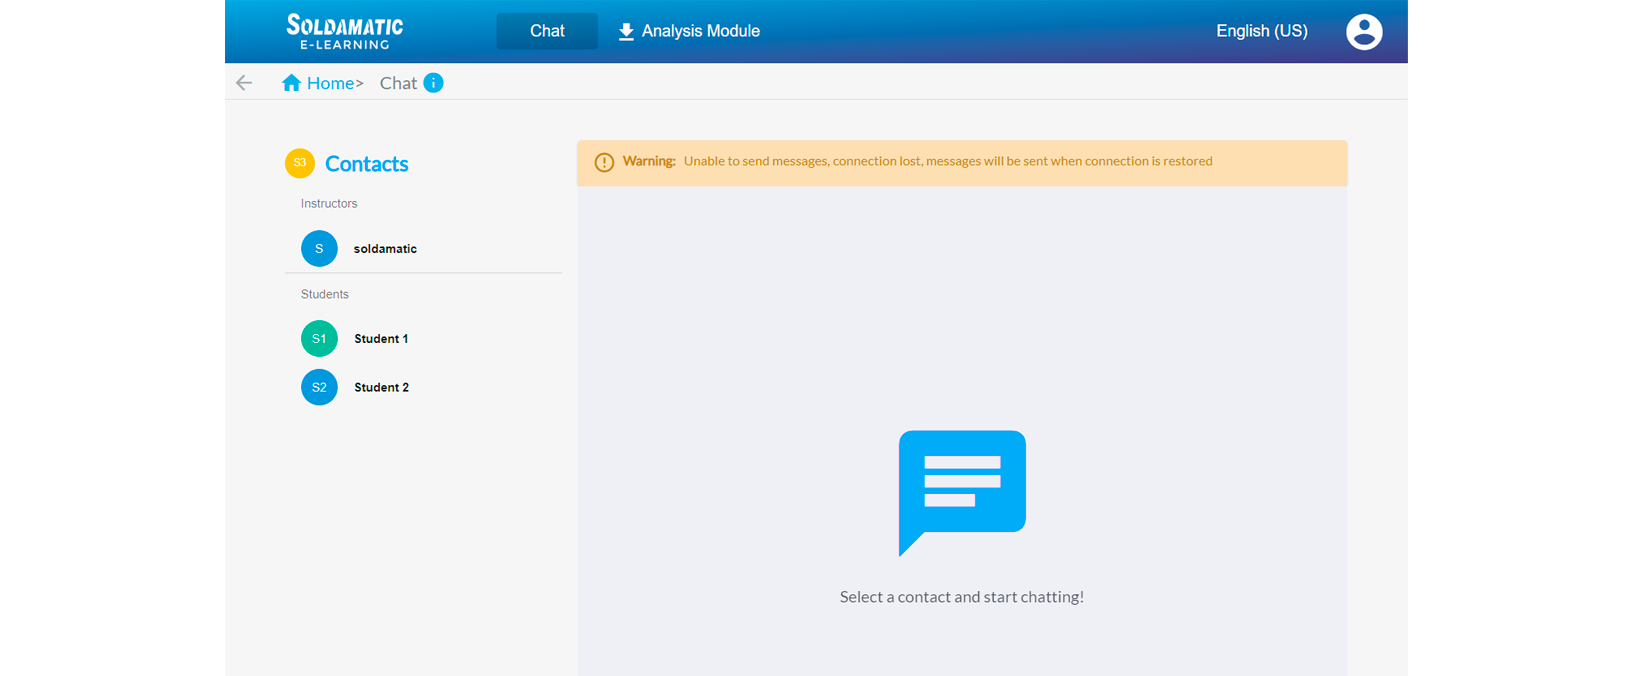
When you have selected the user you want to write to, scroll down to the bottom to type your message.
You will be notified when you receive a message even if you are not in the chat. Notifications outside the chat window. You will be notified when you receive a message even if you are not in the chat.

e-Learning without simulator
If you have Soldamatic e-Learning without a connection to a simulator, you will only be able to see some of the functionalities that this complete educational solution allows, i.e. connected to a Soldamatic simulator.
All functionalities will be enabled when you purchase your first Soldamatic.
1. Teacher Access
To access Soldamatic e-Learning type in your browser the URL: https://elearning.soldamatic.com

Enter your login credentials (centre name provided by Seabery, email and password) and click on «Login» to access.
Once in the application you will see limitations in some of the functionalities, for example:
- In the trend histogram and in the skills charts.
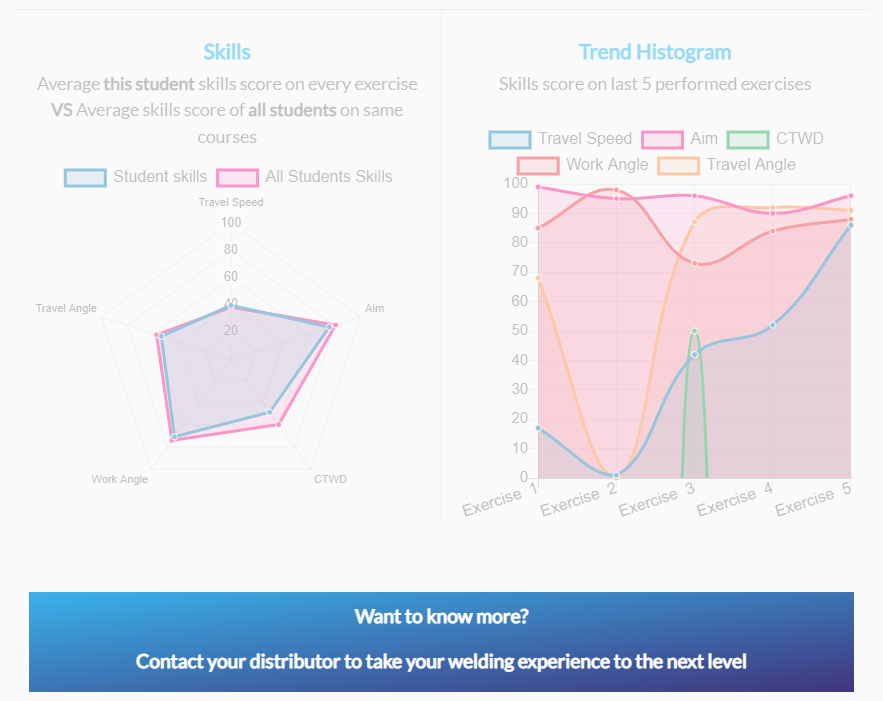
IMPORTANT: You can disable these calls when you connect this application to a Soldamatic simulator.
2. Student Access
To log in as a student for the first time, open your browser and type: https://lms.soldamatic.com
Remember to register the learner through Soldamatic e-Learning (Teacher Access) and provide the login credentials.
Courses
Soldamatic e-Learning without connection to a simulator allows students to access the theoretical contents of a course, to carry out quizzes and to visualise examples of the exercises of the default course: «Soldamatic Welding Curricula». These executions have been carried out in Soldamatic. Examples of correct executions are shown for each exercise, and in some of them, the most common welding errors can also be observed.
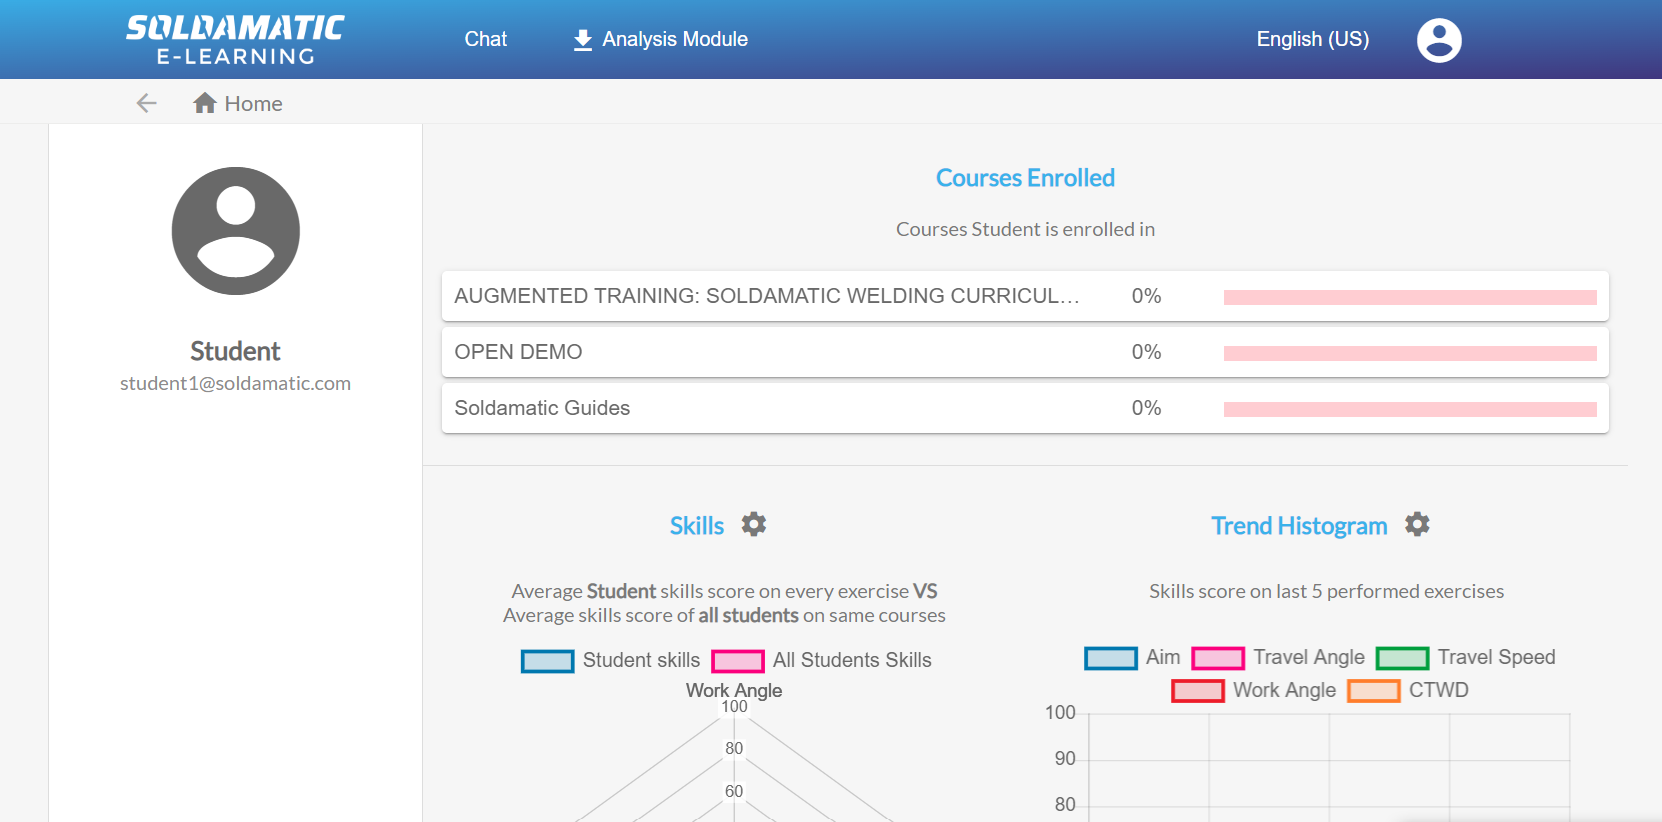
Navigate to the «Augmented Training. Soldamatic Welding Curricula» and click on it. You will see the course tree.
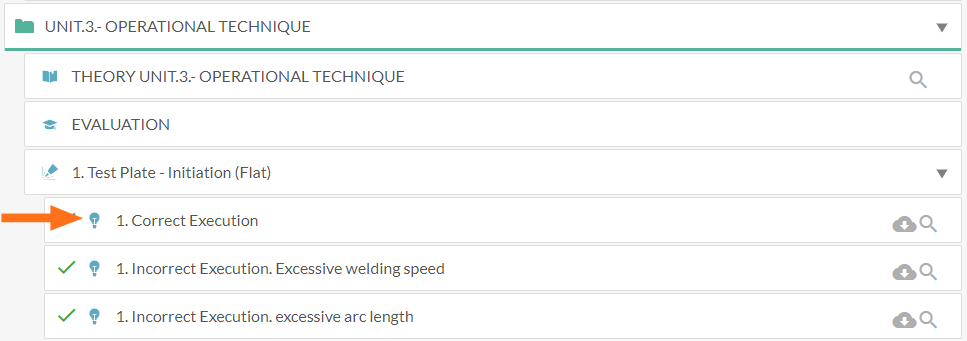
Sample executions are at the same level as normal executions in the navigation tree, they are distinguished by the icon marked on the image.
A window appears with a description of the execution. In the examples of incorrect executions, you will see a brief explanation of the error and its consequences.

The student can review the sample execution like any other execution by dowloading it clicking in the icon. The Analysis Module must be installed to be able to see the executions.

Synchronisation of data with a simulator
Example executions will be available for viewing in a simulator when you connect it to your Soldamatic e-Learning. They can coexist with the runs made in Soldamatic.
